Tuesday, August 31, 2010

Easy Homemade Granola

(about 7 cups)


Recently a friend was talking about how granola could either taste great or be close to revolting. I suggested she try making her own.

It's pretty easy to make, and there's a lot of flexibility in terms of what you can add or leave out. Don't limit yourself to what I have suggested; I just wrote down what came to mind and I know there's even more options out there.

Homemade granola is not only tasty, it's less expensive. I was looking at the ready made stuff for ideas (before heading off to the bulk food section to get the ingredients), and noticed 10-13 oz. bags were selling for $5-$8. Most of these appeared to have about 75-90% rolled oats, with a few nuts, seeds or dried fruit tossed in. Some even used brown sugar instead of honey or maple syrup.


dry portion


3 1/2 cups old-fashioned rolled oats

1 1/2 cups any combination of raw nuts, (almonds, cashews, peanuts, pecans, walnuts, shredded coconut, hazelnuts, pistachios)

1 cup any combination of seeds, (sunflower, pumpkin, sesame, flaxseed, hemp seed)

1/4 cup wheatgerm, (optional)

2 tsp ground cinnamon, (optional)

1/2 tsp salt, (optional)

Preheat oven to 300°F.

Combine all of the above ingredients in a bowl.

liquid portion
1/2 -2/3 cup sweetener, to taste (maple syrup, honey, agave nectar)

3/4 cup unsweetened applesauce

2 tbsp canola oil

1 tbsp vanilla extract, (I used a tbsp of concentrated raspberry sugar I wanted to try out from the bulk spice section at Whole Foods instead. )

Combine all of the liquid ingredients in a 2 cup measuring cup, adding the correct amounts as you go along, then stir until everything is well combined right in the cup.

dried fruit, to be added for the last 10 -15 minutes of baking

1 cup any combination of dried fruit, (currants, raisins, blueberries, cherries, chopped apricots, cranberries, chopped dried apples)

Drizzle half the liquid portion over the dry ingredients and toss, then drizzle the remaining portion and toss until everything is well combined.

Spread the mixture evenly over a nonstick jelly roll pan or lightly greased one.

Bake in the centre of the oven for about *40-75 minutes. Every 15 minutes or so, remove from oven and stir the mixture a bit; to help it brown evenly. When there's about 15 minutes baking time left, sprinkle the dried fruit evenly over the top and return to the oven.

The granola will be done when it's an even golden brown. Cool and store in a sealed container.

*I use my regular oven for storage and bake everything in a counter-top Breville convection oven; it's more fuel efficient and keeps my kitchen cooler in Texas. I use a smallish roasting pan when I make this and the granola layer is about 1 1/2 - 2 inches thick, thus the longer baking time.

If you are using a regular oven and a larger jelly roll pan, you will probably need to shorten the times and start checking the granola every 10 minutes or so, as the granola will brown more quickly.

**I would also like to note here, once the granola has completely cooled, I place half of it into a zip-lock bag and toss it into the freezer; it keeps very well there, until I'm ready to finish it.

Thursday, August 26, 2010

Daring Baker Challenge, August 2010; Baked Alaska


The August 2010 Daring Bakers’ challenge was hosted by Elissa of 17 and Baking. For the first time, The Daring Bakers partnered with Sugar High Fridays for a co-event and Elissa was the gracious hostess of both. Using the theme of beurre noisette, or browned butter, Elissa chose to challenge Daring Bakers to make a pound cake to be used in either a Baked Alasa or in Ice Cream Petit Fours. The sources for Elissa’s challenge were Gourmet magazine and David Lebovitz’s “The Perfect Scoop”.

I really enjoyed this challenge. I had never made a Baked Alaska before. The cake was delicious!

Vanilla Ice Cream
1 cup (250ml) whole milk
A pinch of salt
3/4 cup (165g) sugar
1 vanilla bean, split lengthwise OR 2 teaspoons (10ml) pure vanilla extract
2 cups (500ml) heavy (approx 35% butterfat) cream
5 large egg yolks
1 teaspoon (5ml) pure vanilla extract

1. Heat the milk, salt, and sugar in a medium saucepan until the liquid steams. Scrape out the seeds of the vanilla bean with a paring knife and add to the milk, along with the bean pod. Cover, remove from heat, and let infuse for an hour. (If you do not have a vanilla bean, simply heat the milk, salt, and sugar in a medium saucepan until the liquid steams, then let cool to room temperature.)

2. Set up an ice bath by placing a 2-quart (2 litre) bowl inside a large bowl partially filled with water and ice. Put a strainer on top of the smaller bowl and pour in the cream.

3. In another bowl, lightly beat the egg yolks together. Reheat the milk in the medium saucepan until warmed, and then gradually pour ¼ cup warmed milk into the yolks, constantly whisking to keep the eggs from scrambling. Once the yolks are warmed, scrape the yolk and milk mixture back into the saucepan of warmed milk and cook over low heat. Stir constantly and scrape the bottom with a spatula until the mixture thickens into a custard which thinly coats the back of the spatula.

4. Strain the custard into the heavy cream and stir the mixture until cooled. Add the vanilla extract (1 teaspoon [5ml] if you are using a vanilla bean; 3 teaspoons [15ml] if you are not using a vanilla bean) and refrigerate until thoroughly chilled, preferably overnight.

5. Remove the vanilla bean and freeze in an ice cream maker. If you don’t have an ice cream maker, you can make it without a machine. See instructions from David Lebovitz: http://www.davidlebovitz.com/archives/2007/07/making_ice_crea_1.html

Brown Butter Pound Cake,
19 tablespoons (9.5 oz) (275g) unsalted (sweet) butter
2 cups (200g) sifted cake flour (not self-rising; sift before measuring) (See “Note” section for cake flour substitution)
1 teaspoon (5g) baking powder
1/2 teaspoon (3g) salt
1/2 cup (110g) packed light brown sugar
1/3 (75g) cup granulated sugar
4 large eggs
1/2 teaspoon pure vanilla extract


1. Preheat the oven to 325°F/160°C and put a rack in the center. Butter and flour a 9”x9” (23cmx23cm) square pan.

2. Place the butter in a 10” (25cm) skillet over medium heat. Brown the butter until the milk solids are a dark chocolate brown and the butter smells nutty. (Don’t take your eyes off the butter in case it burns.) Pour into a shallow bowl and chill in the freezer until just congealed, 15-30 minutes.

3. Whisk together cake flour, baking powder, and salt.

4. Beat the brown butter, light brown sugar, and granulated sugar in an electric mixer until light and fluffy, about 2 minutes. Beat in the eggs one at a time, mixing well, and then the vanilla extract.

5. Stir in the flour mixture at low speed until just combined.

6. Scrape the batter into the greased and floured 9”x9” (23cmx23cm) square pan. Smooth the top with a rubber spatula and rap the pan on the counter. Bake until golden brown on top and when a toothpick inserted into the center comes out clean, about 25 minutes.

7. Cool in the pan 10 minutes. Run a knife along the edge and invert right-side-up onto a cooling rack to cool completely.


Meringue (For the Baked Alaska)
8 large egg whites
½ teaspoon (3g) cream of tartar
½ teaspoon (3g) salt
1 cup (220g) sugar

Beat the egg whites, cream of tartar, and salt on high speed in an electric mixer until soft peaks form. Beat in the sugar gradually in a slow stream until stiff peaks form.

Assembly Instructions – Baked Alaska
1. Line four 4” (10cm) diameter tea cups with plastic wrap, so that plastic wrap covers all the sides and hangs over the edge. Fill to the top with ice cream. Cover the top with the overhanging plastic wrap and freeze for several hours, or until solid.

2. Level the top of the brown butter pound cake with a serrated knife or with a cake leveler. Cut out four 4” (10cm) diameter circles from the cake. Discard the scraps or use for another purpose.

3. Make the meringue (see above.)

4. Unwrap the ice cream “cups” and invert on top of a cake round. Trim any extra cake if necessary.

5. Pipe the meringue over the ice cream and cake, or smooth it over with a spatula, so that none of the ice cream or cake is exposed. Freeze for one hour or up to a day.

6. Burn the tips of the meringue with a cooking blow torch. Or, bake the meringue-topped Baked Alaskas on a rimmed baking sheet in a 500°F/260°C oven for 5 minutes until lightly golden. Serve immediately.

Tuesday, August 24, 2010

Pork Tenderloin in Sha Cha Sauce

There are sauces and sauces - endless selection and there are many more that i have not encountered with or have the opportunity to try cooking with them. Walk down the  Sauces'    aisle  in  any asian market and you will know what i mean.. I have not heard of Sha Cha sauce until my friend Belinda used it as a dipping sauce for her hot pot. She told me to add an egg yolk with the sauce and it was so delicious that i had to get a can. Not only is this versatile sauce good as a condiment, it can be a base for soups , as a seasoning for stir-fry dishes and as a rub for barbecued meats.


Ingredients:

2 pieces pork tenderloin (about 12 ozs each)
4 heaped tbsp Sha Cha Sauce
1/2 lb french beans
Cilantro for garnishing


Method:

Trim pork of any visible fat and membrane/silver skin.

Cut off 12 inches or so of butcher’s twine, and put the thin end of the tenderloin in front of you.

Fold the thin end back on itself so that the entire length of the tenderloin is uniformly thick.

Slide the butcher’s twine underneath the tenderloin, and tie the folded thin end with a simple loop and surgeon’s knot.

Cut off the excess string with kitchen shears, and you're ready


Rub on the Sha Cha Sauce on to the pork tenderloin and let it marinate for at least 1 hour in the fridge.

Heat a 12 inch skillet with 2 tbsp oil and brown the pork tenderloins on all sides.

Put in a preheated 425f oven for 10 minutes to finish the cooking.(10 minutes is only a guide, try not to overcook, since overcooking will cause the meat to dry out. It's a good idea to use a meat thermometer to test for doneness; cutting into the meat to test for color will cause too many good juices to run out. A range of 150° to 165° is usually recommended  but i like to take it out at 140 - 150.. This should produce tenderloin that's juicy, tender, and safe. Rest for 5 - 10 minutes, remove the butcher's twine before slicing, )

For the french beans, remove the ends, wash and wipe dry.

Heat about 1/2 cup of oil in a skillet and when oil is hot, deep fry the french beans until crinkly and soft.  Do not fry all the beans at once, fry by batches.

Put the fried french beans on a platter and top with sliced pork tenderloin.  Garnish with cilantro.

Enjoy


Serves

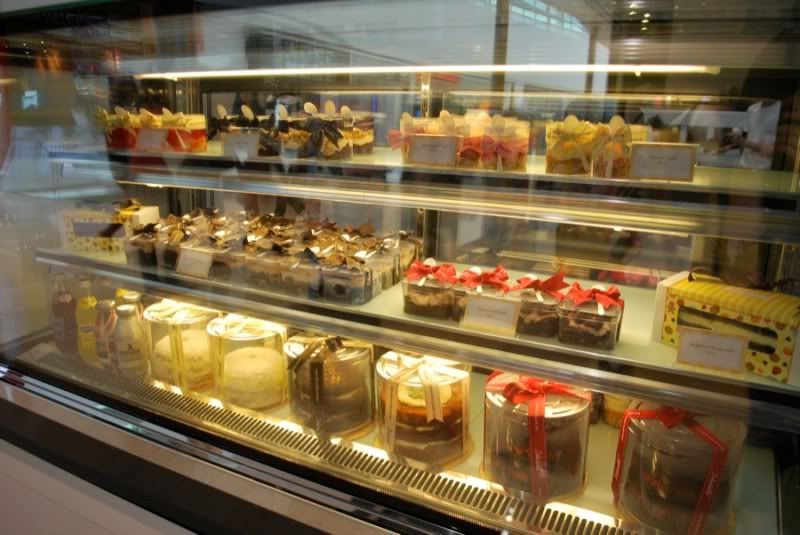
The untold stories behind each Delectable TREAT.

I've always got so much to say about each and every Delectable item on our shelves.
It is of course because I created their flavour components. But another less obvious reason is because I relate to each of them on a personal level. Like how?
Well...
I thought it would be a good idea to convey some of those stories here.
It'll be pretty funny if you start to think about these treats the way I do. Haha I believe Dessert should be about how it's tastes affect the way you feel; how they trigger pleasant memories or thoughts. I'll tell you my secrets on why they make me smile :)


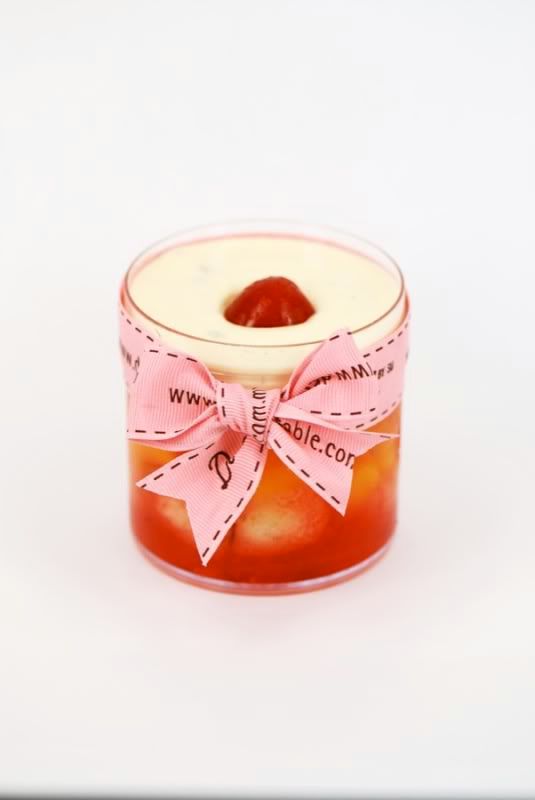
Trifle Treat RM10

There used to be a constant ringing in my head, "BOO! Make trifle!" That would be my sister.
It's what they call me at home "Boo" haha. Sis doesn't make food; but she knows how to make her cravings heard. I'm the little sister who makes the food *LOL*
When we were little; mom would make trifle in huge 'lock-n-lock' containers and we would wipe them clean with 2 spoons and an hour session of Cartoon Network.
Mom and her siblings were educated in the UK; and I suppose making trifle as dessert was a thing they picked up from living in London for so many years. There's nothing like buttery and rich cake hidden in yummy berry jello filled with fruit and topped with creamy vanilla custard! Sigh* the whole combination is genius! Dad really likes trifle too; mom and dad met while studying in the UK..... .. but that's another story all together! hehe

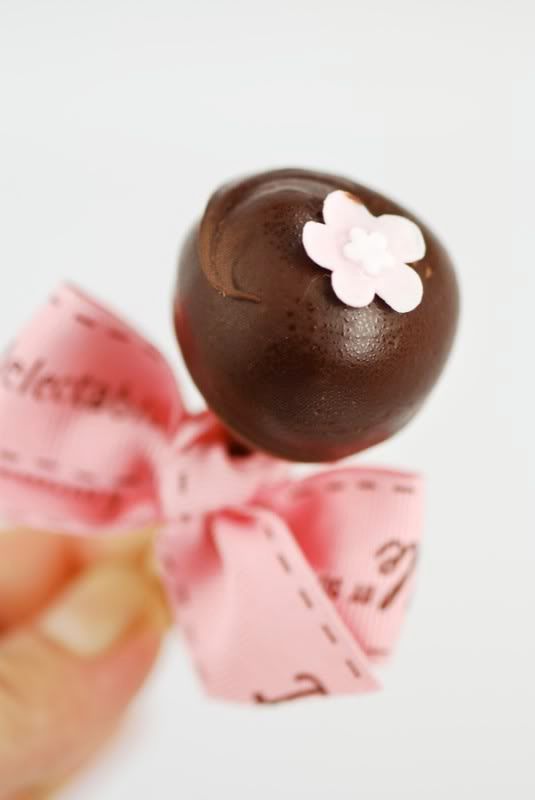
Tim Tam truffles RM4

These little gems on sticks shot me from baking for fun to baking for business while I was in Australia. Back then; making them into little bouquets felt like a fun thing to do for my blog. I've even got a video of me making the truffles! hahaha it's so funny when I watch it now!


I was walking down the street to uni with a bouquet of truffles in my hand and a lady sitting al fresco at the cafe outside of my home became very intrigued with what I had with me. I explained that they were something I had made for my friends at Uni and I offered her one. The next day; she had the cafe owners track me down for my contact number and before you know it; I began selling these on a weekly basis to people who would place bookings for my truffles!
They are really fun to eat cause it tastes almost like a chocolate cheesecake + timtam cookies crushed together! Not too sweet; a tiny bit indulgent and just a little tangy from the cheese. If you love timtams; you gotta try this one!

Moist Chocolate loaf RM30

This recipe was my solution to all unhappiness at home when I was at UNSW with my dearest housemates. Out of the string of girls I've lived with and grown very much attached to down under; I don't remember a single one of them who wasn't happy to see this chocolate cake on the kitchen table. Exam time, boyfriend trouble time, paying up rent time.. .. or whatever the trouble may be.. each time there was someone who needed cheering up; I would pull this out and there will be laughter and giggles all over the kitchen island bench top instantly. I really loved baking this because it reminds me of the amazing time we spent together and the friendships we've created to last forever. It doesn't matter how different our paths may be in the future; I'll always be their 'mommy' who makes chocolate cake each time they whine for something yummy in the oven.

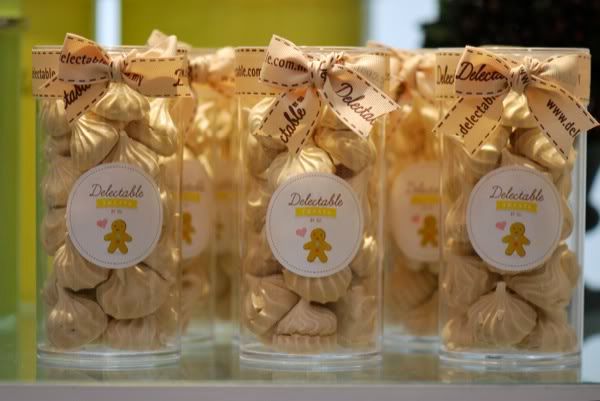
Meringue Candies RM8

Just 3 years ago; I was certain I was destined to never be able to make meringues. At the time; eggwhites were the enemy... and I tried over and over again to bake them till we became best friends. That never happened. Not until I went to pastry school and realized the mistake was in my arm, and not so much the recipe. *sigh*
I sell tiny little piped meringue candies in the store cause they remind me of Jo. I would either get him a bag of mini meringues or a toffee apple each time we went grocery shopping together. Jo has a sweet tooth and it helped keep him enthusiastic about the shopping and carrying of bags after. ;) I loved watching him tear open the bags the minute we got home to dig out his treat/reward with a big big smile.
I wanted very much to make meringues successfully because I knew he loved pavlova more than anything. Everytime he caught me sitting in front of the oven with a pout close to tears... I remember how Jo always was full of encouraging words. He would pat my head and say "Awww... poor baby; it doesn't matter, we've got a little more, you can try again; or we can just get meringues from the supermarket" hehe Jo was a gem.
Well; I can finally make meringues now!~ and they're just as yummy as the ones I used to buy for him at the supermarket ;) My Delectable candies even have coffee flavour to them too! Eggwhites and I are no longer enemies! yay!

Sunday, August 22, 2010

Over-Cooked Eggs

I really hate it when my pastry baking flops from improperly baked eggs. My yolks were supposed to be runny! and they would have been if I watched the oven like I should have!
I like em gooey and deliciously flavourful. Full .. of yummy cholesterol goodness *giggle*


Salmon Egg-y puff pies

6 4'x4' Frozen Puff pastry squares
3 slices smoked salmon
3 eggs
3 tbsp of grated mozzarella
Fresh oregano (roughly torn)
a dash of flake sea salt
cracked black pepper

Preheat oven to 180degrees celcius
Slice 3 pastry squares into 4 strips each. Place the other 3 squares onto a baking tray.
Use strips to form a square tartlet on the 3 base squares (refer to photograph). Press down a little to stop leakage on the corner seams.

Divide cheese, smoked salmon and herbs into the 3 prepared tart cases. Gently break an egg into the center of the tart, being very careful not to pierce the yolk.
Immediately place in the oven and cover loosely with a sheet of foil over the top. Bake for 35-40 minutes until eggs begin to cook slightly but still remains runny; pastry should be puffed at this point. Remove foil; Sprinkle with pepper and herbs; bake uncovered for another 5 minutes until golden and crisp on the corners and eggs are a little jiggly.
Serve immediately! some put ketchup on this. I would have mustard instead.


I filled these with the best smoked salmon, expensive cheese and freshly bought herbs. They were supposed to come out SUPER. Well.. they didn't cause I was careless. I feel pretty bad when I see good yolks go to waste. Got bored? complacent? didn't watch the timing and the oven temperature..
Yea; I am beating myself up about it... and yes; I'm also talking in code.
This post isn't about the my eggs; or their yolks; or my inability to make puff pies. It probably is about the person I made them for, how he loves eggs runny and how we've 'over-cooked' our fun times together.... It's only a probability. *shrug* ;) hahaha
I'm just tired of having bad overdone eggy-pies now... dwelling comes to a halt. moving along! I need GOOD eggs; not bad ones! LOL
Will have an obsession about strawberries instead tomorrow. *wink*

Try the egg-ypie recipe! They taste AWESOME! reallly! If you don't like salmon; fill it with roast chicken or peas even! Filling combo's probabilities are endless!

Saturday, August 21, 2010

Mixed Sour Refrigerator Pickles

(6 pints)


I intended to pickle a few cucumbers, but when I got to the farmers' market last week, I decided mixed vegetables would be nicer.

The spices I used for these were a bit different than what I usually go for because the grocery store I went to didn't have what I needed and I wasn't in the mood to drive all over town in the heat looking for stuff, so I used yellow mustard seeds and fennel seeds instead. The fennel is quite nice, I think.

They say refrigerator pickles should be consumed within a month or so, but I have had the odd jar last up to 3 or 4 months in my refrigerator (and it's been fine); mainly because I put something larger in front and forgot they were there. This batch might not even last a month because I'm already working on the second jar.

These pickles are on the sour side. If you prefer something a bit more mellow then replace some or all of the vinegar with rice vinegar.

You might have to adjust the ingredients slightly
2 3/4 cups water
3/4 cup white vinegar
1/2 cup white wine vinegar
3 tbsp agave nectar
1-2 tbsp kosher salt, to taste
1 small piece of ginger, peeled and sliced

4-5 small zucchini
1/2 lb green beans
4-6 small cucumbers
1/2 onion, sliced thin
1 bell pepper
4 medium carrots,

1-2 tbsp mustard seed
1-2 tbsp fennel seeds
1 tbsp peppercorns

6-9 cloves of garlic, to taste, chopped or sliced
1 small bunch fresh dill
6 bay leaves

Thoroughly wash the pint jars in very hot water or run them through the dishwasher.

Clean, seed and cut up the vegetables into sticks and/or slices, sized to fit the pint jars. They ended up generously filling a 2 quart measure I have.

Bring the water, vinegars, agave nectar and salt to boil in a non-reactive pot. Add the ginger and simmer for about two minutes, remove from heat.

Lightly crush the mustard, fennel and peppercorns in a mortar and pestle or use a rolling pin and crush them on a cutting board.

Divide the seeds and peppercorns evenly among the jars. Divide and arrange the vegetables, garlic, and dill sprigs in the jars. You can lightly pack in the vegetables as they will shrink a bit as they marinate. Place one bay leaf into each jar.

Ladle the brine into each jar. Divide the ginger slices and add those to the jars. If it looks like there's not enough brine then just make up the difference with a bit of extra water to each jar.  Cover with a lid and refrigerate. Allow to marinate at least 4-5 days. I like to shake the jars every day, but I'm not certain if that's necessary.

Winter Melon Soup/Toong Kua Tong

This summer has been hot, so this is a common summer soup to relieve heatiness and cool down the body. My maternal grandma - Ah Poh is Cantonese, so drinking soup is important to my cantonese part in me.  My Ah Poh does not know how to even boil a pot of water, she had a 'Mui chai' who came along with her when she got married.  I later found out that  was why i had 2 'Tai Yee Mah' cos Ah Poh had considered her as her daughter.  Although Ah Poh did not know how to cook, she was an expert in criticising all foods served.  She had been branded with the saying - 'Hue Than mng hue cheong".  I remembered that she reminded my mother that a little piece of 'Tai Tau Choy' had to be added to Winter Melon Soup to enhance the flavor of the soup.  There are a variety of additions you can add to make this soup flavourful and unique and 'Tai Tau Choy' is a must for me.


Ingredients:

1 slice Winter melon (based on the diameter of 8″ and thickness 2″)
1 lb Pork ribs
8-10 pcs Red dates - pitted
5 or 6 dried shitake mushrroms - soak
1 piece  tai tau choy - soak and wash away the salt
3-5 pcs Dried oysters/dried scallops/dried octupus/dried squid - soak
Salt to taste

Method:

Put pork ribs in the pressure cooker and put in enough water to cover the ribs.  Bring it to the boil and conitinue to boil until all the scums rise to the surface.  Remove all the ribs and wash away all the scums.  Discard the water in the pressure cooker and wash preassure cooker really well.

Cut winter melon into small cubes of 1″ (remove seeds and skin)

Put cleaned ribs back to the pressure cooker together with the rest of the ingredients except the salt.  Put in the water that mushrooms and dried octupus were soaked.  Top up with more water until it is enough to cover the ingredients.  Close the lid of the pressure cooker and pressurized for 30 - 45 minutes, counting from the time the pressure cooker starts hissing.

Turn off heat when cooking time is over and let the pressure released by itself before opening the lid.

Taste the soup before adding salt as tai tau choy can be very salty.

Enjoy


Serves

Polenta Mushroom Casserole

(4-5 servings)


This layered casserole came about after I purchased a chub of organic polenta.  I had mushrooms, tomatoes and cheese at home and was planning on making lasagna with them, but this turned out to be a delicious alternative.

2 tsp olive oil
2 cloves garlic, minced
1 onion, chopped
1 1/2 lbs mushrooms, sliced
1- 1 1/2 tsp fresh rosemary, leaves minced
2 tsp Better Than Bouillon Organic Mushroom Base
1/4 cup white wine (optional)
1 cup ricotta cheese
1/3 cup soft goat cheese
3 tbsp unbleached flour
salt and freshly ground black pepper
18 oz chub of polenta (I might make this from scratch another time)
2 large tomatoes, sliced
1/3 cup of shredded cheese (I used gruyere and garlic cheddar)

Butter an 8 inch square baking dish and set aside.

Heat the oil in a large skillet. Add the garlic and saute for a minute, then add the onions and continue to cook until they soften and take on an amber hue.

Add the mushrooms, rosemary, mushroom base and wine if using. Stir well to combine and then cook until most of the liquid has evaporated; about 15 minutes.

Stir in the ricotta and goat cheeses; season with salt and pepper. Sift the flour evenly over the mixture and stir to combine well. Set aside

Preheat the oven to 350ºF.

Remove the plastic from the polenta and cut into slices; the thickness being determined by the ability to line the baking dish with two layers.

Place a layer of polenta (half of the chub) over the bottom of your dish. Cover with half of the mushroom mixture, then half of the tomatoe slices, and half of the shredded cheese.

The repeat these layers with the remaining polenta slices, mushroom mixture, tomatoes and cheese.

Bake for about 50-60 minutes or until it's hot and bubbling. Allow to cool for about 15 minutes, then serve. This is also good at room temperature.

Thursday, August 19, 2010

Pear and Ginger Muffins

(12 standard muffins)


I picked up some gorgeous pears the other day and set aside a couple to make these muffins. A few months ago I had thought about making a steamed pear and ginger pudding for Daring Bakers, but made a steak and kidney pudding instead. When I looked at those pears, I thought about that combination once again.

(There you go Lisa, stuck it on a plate for you :p)

I have been on a bit of a muffin roll lately. These pear and ginger muffins hit the spot; they were moist, not too sweet, with good ginger flavour and a hint of lemon. I'm pleased I have been using whole wheat flour, bran and flax in my recent recipes without turning out heavy and dense muffins; in part that was always a fear of mine.

I did end up reducing the amount of applesauce and yogurt for these because two chopped pears provide a lot of moist fruit. There was a tad more batter than usual, but it was also a bit stiffer, so I just used all of it to fill the muffin tins resulting in small domes which rose almost 1/2" past the tops. Once baked, I had slightly larger muffins than usual.

Oh, and if you are wondering about the freshly ground black pepper. It's often added to German gingerbread, so I added some here. It provides a very subtle sharpness which works, I think.

Then there's the agave nectar, wonderful stuff! I've been using it to sweeten my coffee.

3/4 cup unbleached flour
3/4 cup whole wheat pastry flour
1/4 cup wheat bran
1/4 cup ground flaxseed
1/4 cup chopped crystallized ginger
2 tsp ground ginger
1 tsp cinnamon
1 tsp lemon zest, minced
1 tsp baking powder
1 tsp baking soda
1/4 tsp freshly ground black pepper (optional)
1/4 - 1/3 cup agave nectar, honey or maple syrup, to taste
1/4 cup unsulfured blackstrap molasses
1/2 cup unsweetened applesauce
1/2 cup plain greek style yogurt
1/4 cup olive or canola oil
2 large eggs
2 firm ripe pears, cored and chopped (I used Bosc)

Preheat oven to 375°F. Line a 12 cup standard muffin tin with baking papers or grease and flour. Set aside.

Mix the flours, flaxseed, bran, gingers, cinnamon, lemon zest, baking powder, baking soda and ground black pepper (if using) in a bowl.

Whisk together the agave nectar, molasses, applesauce, yogurt, oil and eggs in a bowl until well combined.

Pour the liquid portion over the dry ingredients, add the chopped pear and stir to combine until everything is just moistened.

Divide and spoon the batter evenly into the prepared muffin tins; it will probably go a bit past the top of the tin. I just spooned the extra batter in the centres creating little domes resulting in larger muffins than usual.

Bake for about 18-23 minutes or until a toothpick inserted into the centre of a muffin comes out clean.

Spinach, Mushroom and Ham Quiche

When i visited Seatle last year, i took the opportunity to meet up with my dear friend, TT.  Although TT can be the son that i never had(how i wish), his knowledge in the culinary arena surpass mine by many folds.  Visit his blog Playing With My Food and you will understand what i mean.  When i met up with him for dim sum, he gave me this book -The Sweeter side of Amy's Bread"  and wished me well by writing this - To Lily - May you always be on the "Sweeter" side of life".  I was quite choked up with his wishes and when i feel down, i always kept  this in mind.  So, out with this book and made this Quiche.  This recipe is a keeper, thank you TT, if not for you, making this lovely recipe will not be possible.


Ingredients:


Whole Wheat Pastry Crust:

2/3 cup/5.15 ozx/146 gm unsalted butter, cut into 3/4 inch dice
5/8 cup + 1 tbsp/4 ozs/112 gm cream cheese
4 tbsp/1.83 ozs/52 gm ice water
2 1/2 apple cider vinegar
1 cup + 1 1/2 tbsp/5.60 ozs/158 gm unbleached all-purpose flour
1/2 cup/3.0 ozs/86 gm whole wheat flour
3/4 tsp kosher salt/1.2 tsp table salt
1/2 tsp baking powder

Method:

Freeze the diced butter and cream cheese for at least 30 minutes.  In a small cups or bowl, combined the iced water and the vinegar.

In a food proccesor fitted with the metal balde, combine the 2 flours, salt and baking powder and process them for 5 seconds until they are just combined. 

Add the frozen chunks of cream cheese and process again for 5 seconds or until the mixture looks like coarse meal.

Add the butter chunks and process again for 10 to 15 seconds until the largest pieces of butter are about the size of peas.

Transfer the mixture to a large bowl and sprinkle it with the ice water mixture. (If you don't have a food processor, mix the dry ingredients in a large bowl with a wire whisk and rub very cold, not frozen, cream cheese into the flour with your fingers until it looks like coarse meal..  Repeat the process with very cold, not forzen, butter chunks until the largest pieces of butter are about the size of peas.  If the butter starts to feel soft, freeze the mixture for 10 minutes before continuing.  Sprinkle the ice water mixture over the flour).  Using your hands, stir the mixture, pressing it together firmly until it forms. a cohesive ball of dough.  There should not be any pockets of dry crumbs remaining.  If necessary sprinkle in another 1 or 2 tsps of ice water.  Place the ball of dough on a large piece of plastic wrap, seal the wrap aaround the dough, and flatten the ball to make a round 3/4 inch thick disk.  Refrigerate for at least 30 minutes before rolling it out.  This dough may be kept refrigerated for up to 2 days or frozen for up to 6 months.

Ingredients for the Quiche 

1 tbsp + 1/2 tsp olive oil
One 8 oz package fresh mushroom, halved, cunt into 1/8 inch slices
1 cup ham diced very small
One 10 oz package frozen chopped spinach, thawed and drained
Salt and pepper to taste
3/4 cup onion - finely chopped
2 1/2 tsp garlic finely chopped

1 cup Monterey Jack cheese corarsely shredded

Custard Filling

1 1/2 cup/8.5 oz/240 gms half and half
5 large eggs
1/2 tsp kosher salt
A pinch of ground cayenne pepper

Method:

Position one rack in the middle of the oven, and preheat the oven to 400f. 

Line the 12 x 17 inch sheet pan with baking parchment. 

Remove the bottoms from the mini tart pans or a 9 or 10 inch tart pan and place bottomless pans on the prepared sheet pan.

Roll out the pastry on a lightly floured surface to a thickness of 1/8 inch.  Cut 6 circles of dough, each 6 1/8 inches in diameter.  Line each tart pan with a dough circle and blind bake the crusts(use coffee filters and topping with weights(i used beans)  for 20 minutes, or until they barely begin to brown.  Remove the weights and the paper and continue baking for 4 - 5 more minutes, until lightly browned and the bottoms are just starting to look a little dry.  Don't be concerned if the crust bottoms puff up slightly after the weights are removed, they should deflate again when they come out of the oven.

In a medium skillet or saute pan, heat 1/2 tsp of the olive oil and cook the mushrooms over medium heat with salt and pepper to taste, stirring occasionally until their water has been released and they start to brown 6 - 7 minutes.  Transfer the mushrooms to a large bowl and set aside.

Heat 1 tbsp of the olive oil in the pan and add the onions and garlic with a pinch of salt and pepper to taste and cook, stirring occasionally, until they become translucent, 2 - 3 minutes. 

Add the spinach and ham to the pan, sprinkle with salt and pepper to taste, and cook briefly until the spinach and ham are cooked through,  Transfer the mixture to the bowl with the mushrooms and mix it all together with a wooden spoon until everything is evenly distributed.  Let  cool slightly before mixing in the cheese.

To make the custard filling

In a large measuring cup or a 3 to 4 cup container with a pour spout, whisk together the half and helf , eggs, salt and cayenne pepper until well combined.

Five to 10 minutes after the crusts come out of the oven, with the tart pans still on the baking sheet, spread 1/3 cup of the spinach, mushroom, ham and cheese mixture evenly in the bottom of each tart shell.  If using a 9 - 10 inch tart pan - use all the mixture. 

Stir the custard and pour it over the spinach, filling each pan to within 1/8 inch of the top edge of the pastry.  Don't overfill the shells, or the custard will run out during baking.  It's not a total disaster if this happens.  The quiche will still be edible but there will be less filling in the shell.

Return the pan to the oven abnd bake for 20 - 25 minutes, or until the eges of the filling begin to puff up and the center still jiggles slightly when you shake the pan.  (The 9 - 10 inch tart pan might need a longer time to get custard to set).

Place the sheet pan on a wire rack to cool.  When cooled enough to handle, remove the quice from the pans.  Pans with filling that has run over may have to cool longer before the quiche can be extracted from the pans.

Serve slightly warm or at room temperature.

Leftovers may be regrigerated or frozen and reheated in a 400f oven for 20 minutes, or until heated all the way through.


Serves

Tuesday, August 17, 2010

Futomaki - Thick Sushi Roll

Futomaki are thick sushi rolls which includes various fillings. They are also known as fat rolls. My friend Sam who is a Sushi Chef told me that it is easy to make Sushi.  All i needed was some goodwill and a good guide, meaning that he will show me how.  Looking at his nimble fingers working with the rice, trying not to blink in case i missed some valuable tips, but i must have blinked, cos the roll was ready right before me,  like magic, my mouth was opened wide with astonishment.   I insisted that he would have to roll on slow motion and this time, he went extra slow, so i had more ideas of how a good sushi roll was done.  Then it was my turn,  i was so excited that i forgot all the tips and made a huge mess.  Our hungry friends could not wait for lunch, so Sam had to continue making lunch for us and i promised him that i will go home and try to remember his teaching and not make a mess.  You think that i will remember?  I did keep my promise , i made some and a mess too.


Sushi Rice:
Ingredients: 

2 cups sushi or short grain rice
2 cups water, plus extra for rinsing rice
2 tbsp rice vinegar
2 tbsp sugar
1 tbsp kosher salt or 2 tsp regular table salt

Method:

Place the rice into a mixing bowl and cover with cool water. Swirl the rice in the water, pour off and repeat 2 to 3 times or until the water is clear.  Pour enough water to cover rice and let it soak for 30 minutes.

Place the rice and 2 cups of water into the rice cooker and cook rice until done.

Combine the rice vinegar, sugar and salt in a small bowl and heat in the microwave on high for 30 to 45 seconds.

Transfer the rice into a large wooden or glass mixing bowl and add the vinegar mixture. Fold thoroughly to combine and coat each grain of rice with the mixture. Allow to cool to room temperature before using to make sushi

California Roll

Ingredients:

Juice of 1/2 lemon
1 medium avocado, peeled, pitted, and sliced into 1/4-inch thick pieces
4 sheets nori
1/2 batch sushi rice, recipe as above
1 small cucumber, peeled, seeded, and cut into matchstick-size pieces
4 crabsticks, torn into pieces


Pickled ginger, for serving
Wasabi, for serving
Soy sauce, for serving


Method:

Squeeze the lemon juice over the avocado to prevent browning.

Cover a bamboo rolling mat with plastic wrap.

Lay 1 sheet of nori, shiny side down, on the plastic covered mat.

Wet your fingers with water and spread about 1 cup of the rice evenly onto the nori.

Place 1/8 of the cucumber, avocado and crab sticks in the center of the sheet.

Grab the edge of the mat closest to you, keeping the fillings in place with your fingers, and roll it into a tight cylinder, using the mat to shape the cylinder. Pull away the mat and set aside. Cover with a damp cloth.

Repeat until all of the rice has been used. Cut each roll into 6 pieces.

Serve with pickled ginger, wasabi and soy sauce.


Saturday, August 14, 2010

A Maize-ing Soup

Maize  was or is the term used  for Corn in the United Kingdom and Ireland and since Malaysia was colonised by the British, maize it was to me for the longest ever, until there came Sweet Corn in the Malaysian markets.  I did not realised that Maize and Corn are the same becauce the difference in taste and texture were totally different,  the maize was woody, starchy and it took a lot of mouth grinding to finish a cob, while the sweet corn needed no introduction espeicially when we are here in sweet corn Heaven.   In Chinese Medicine, corn and celery are used as a stomach tonic, carrot and tomato promote  digestion, lastly the humble potato heals inflammations and is used as an energy tonic.  With these goodness in a soup, what can go wrong? 


Ingredients:

2 ears of fresh corn - cut into 1 1/2 inch slices
3 large tomatoes - quartered
2 stalk celery - cut into 1 inch lengths
2 carrots - peeled and cut into 1 inch lengths
2 potatoes - peeled and cut into halfs
2 lbs pork spareribs/neck bones
Salt to taste


Method:

In the pressure cooker, put the pork bones in and enough water to cover the bones.  Bring to high boil and let boil until most of the scum is floating on top of the water.  Turn off heat and pour the contents through a colander.  Wash the bones thoroughly with cold tap water until all scums are removed. Wash the pressure cooker well, removing scum and fat that are stuck to the pot.

Put bones back into the clean pressure cooker and add in the corn, tomatoes and wai san with enough water the cover ingredients.  Make sure that the water level is not more than 2/3 full - pressure needs to be built with space.  Pressurized for 30 minutes and turn off heat, allowing the soup to continue to cook in the pressure.  Remove lid only when the pressure is totally off and add salt to taste.   If you are in a hurry for dinner, put pressure cooker under the tap and run the cold water over the lid of the pressure cooker,  this should bring the pressure down fast and you can soup on the table as soon as salt is added to taste.

Serves