Showing posts with label Breakfast. Show all posts

Friday, September 10, 2010

Making Yogurt in the Microwave

This summer, prices for a gallon of milk has gone down tremendously - only $1.49 for a gallon. Thus making homemade yogurt less expensive.although it is already so much less than the store-bought ones. Making your own helps you control the amount of fat you consume but i find that whole milk yogurt is richer and tastes the best. Fruits and berries are of abundance and cheap too, so do add as much or varieties into your yogurt, it is a real treat. Yogurt-making in any other way is a lengthy project, but using the microwave to make yogurt can save you some time in the process


Ingredients:

Glass bowl

4 cups fresh milk
1/4 cup powdered milk (adding this gives a better texture)
2 tbsp. plain yogurt with active cultures - from the supermaket is fine or leftover from a previous homemade batch

Food thermometer

Microwave

Plastic wrap

Dish towel


Method:
Take the plain yogurt out of the fridge and leave it out on the counter - it has to be at room temp. (Yogurt will take a longer time to set if cold yogurt is used)

Pour 4 cups of fresh milk into a glass bowl that is safe to use in a microwave. Choose skim milk for a nonfat yogurt or whole milk for a richer yogurt. (i put the milk in the container that the completed yogurt will be stored in the fridge - save me washing the glass bowl)

Add 1/4 cup powdered milk and stir well.

Put the bowl of milk in the microwave and heat it on high power for 3 - 4 minutes. The temperature of the milk should reach 175 - 180 degrees F. (Time to reach 175 - 180 f depends on the wattage of your microwave) After 4 minutes or more, check the temperature with a food thermometer.(Cooking the milk is to kill unnecessary bacteria present)

Allow the milk to cool down for a few minutes. Keep the thermometer in the bowl and let it cool down until the temperature reads 100 degrees F(Higher temp will kill the culture)

Add 2 tbsp.plain yogurt with active cultures to the milk. This serves as your starter. Stir well.

Cover the bowl with milk and yogurt with plastic wrap (my container has a lid, so i just close it with the lid)and wrap a dish towel around it to provide additional insulation.(It is hot now, summer, so i do not need to wrap with a dish towel, i left it on the counter).

The yogurt will be set eventually and when set, put in the refrigerator to chill, it will set further.(If you like your yogurt sour, keep it longer on the counter before chilling in the fridge)

Enjoy with fruits, granola etc, anything your heart desires.

As part of the Foodbuzz Tastemaker Program, I received this ALL-BRAN Bran Buds from Kellogg's and i have been enjoying it with my yogurt every morning. Thank you Kellogg's.

.


Serves

Thursday, September 9, 2010

Bran Muffins with Dried Apricots

(12 standard muffins)


Usually bran muffins contain raisins. I didn't have any in the house and didn't feel like going out in this heat, so I chopped up some dried apricots instead.


I ended up making two batches of these, with a few tweaks the second time. (The first batch was a bit sweeter than I like.) This was fine because I only made half the recipe each time. The final batch was moist, not too sweet and very good imo.

1 cup whole wheat pastry flour
3/4 cup wheat bran
1/4 cup ground flaxseed
1 tsp ground cinnamon
1/4 tsp ground ginger
1 tsp lemon zest, finely minced
1 tsp baking powder
1 tsp baking soda
2/3 cup chopped dried apricots, dried fruit or raisins
1/4 cup agave nectar or honey
1/4 cup blackstrap molasses
1 cup unsweetened applesauce
1/2 cup plain yogurt
1/4 cup olive or canola oil
2 eggs

Preheat oven to 350°F. Line the muffin tins with paper or grease and set aside.

Combine the bran, flour, flaxseed, cinnamon, ginger, lemon zest, baking powder, baking soda and dried fruit in a bowl. Mix well.

In another bowl whisk together the agave nectar, molasses, applesauce, yogurt, oil and eggs. Pour this over the dry ingredients; stir until just combined.


Spoon the mixture into the prepared muffin tin, dividing the batter evenly between the 12 cups. The batter will come up right to the top.

Bake for about 25-30 minutes or until a toothpick inserted into the centre of a muffin comes out clean.

Tuesday, August 31, 2010

Easy Homemade Granola

(about 7 cups)


Recently a friend was talking about how granola could either taste great or be close to revolting. I suggested she try making her own.

It's pretty easy to make, and there's a lot of flexibility in terms of what you can add or leave out. Don't limit yourself to what I have suggested; I just wrote down what came to mind and I know there's even more options out there.

Homemade granola is not only tasty, it's less expensive. I was looking at the ready made stuff for ideas (before heading off to the bulk food section to get the ingredients), and noticed 10-13 oz. bags were selling for $5-$8. Most of these appeared to have about 75-90% rolled oats, with a few nuts, seeds or dried fruit tossed in. Some even used brown sugar instead of honey or maple syrup.


dry portion


3 1/2 cups old-fashioned rolled oats

1 1/2 cups any combination of raw nuts, (almonds, cashews, peanuts, pecans, walnuts, shredded coconut, hazelnuts, pistachios)

1 cup any combination of seeds, (sunflower, pumpkin, sesame, flaxseed, hemp seed)

1/4 cup wheatgerm, (optional)

2 tsp ground cinnamon, (optional)

1/2 tsp salt, (optional)

Preheat oven to 300°F.

Combine all of the above ingredients in a bowl.

liquid portion
1/2 -2/3 cup sweetener, to taste (maple syrup, honey, agave nectar)

3/4 cup unsweetened applesauce

2 tbsp canola oil

1 tbsp vanilla extract, (I used a tbsp of concentrated raspberry sugar I wanted to try out from the bulk spice section at Whole Foods instead. )

Combine all of the liquid ingredients in a 2 cup measuring cup, adding the correct amounts as you go along, then stir until everything is well combined right in the cup.

dried fruit, to be added for the last 10 -15 minutes of baking

1 cup any combination of dried fruit, (currants, raisins, blueberries, cherries, chopped apricots, cranberries, chopped dried apples)

Drizzle half the liquid portion over the dry ingredients and toss, then drizzle the remaining portion and toss until everything is well combined.

Spread the mixture evenly over a nonstick jelly roll pan or lightly greased one.

Bake in the centre of the oven for about *40-75 minutes. Every 15 minutes or so, remove from oven and stir the mixture a bit; to help it brown evenly. When there's about 15 minutes baking time left, sprinkle the dried fruit evenly over the top and return to the oven.

The granola will be done when it's an even golden brown. Cool and store in a sealed container.

*I use my regular oven for storage and bake everything in a counter-top Breville convection oven; it's more fuel efficient and keeps my kitchen cooler in Texas. I use a smallish roasting pan when I make this and the granola layer is about 1 1/2 - 2 inches thick, thus the longer baking time.

If you are using a regular oven and a larger jelly roll pan, you will probably need to shorten the times and start checking the granola every 10 minutes or so, as the granola will brown more quickly.

**I would also like to note here, once the granola has completely cooled, I place half of it into a zip-lock bag and toss it into the freezer; it keeps very well there, until I'm ready to finish it.

Thursday, August 19, 2010

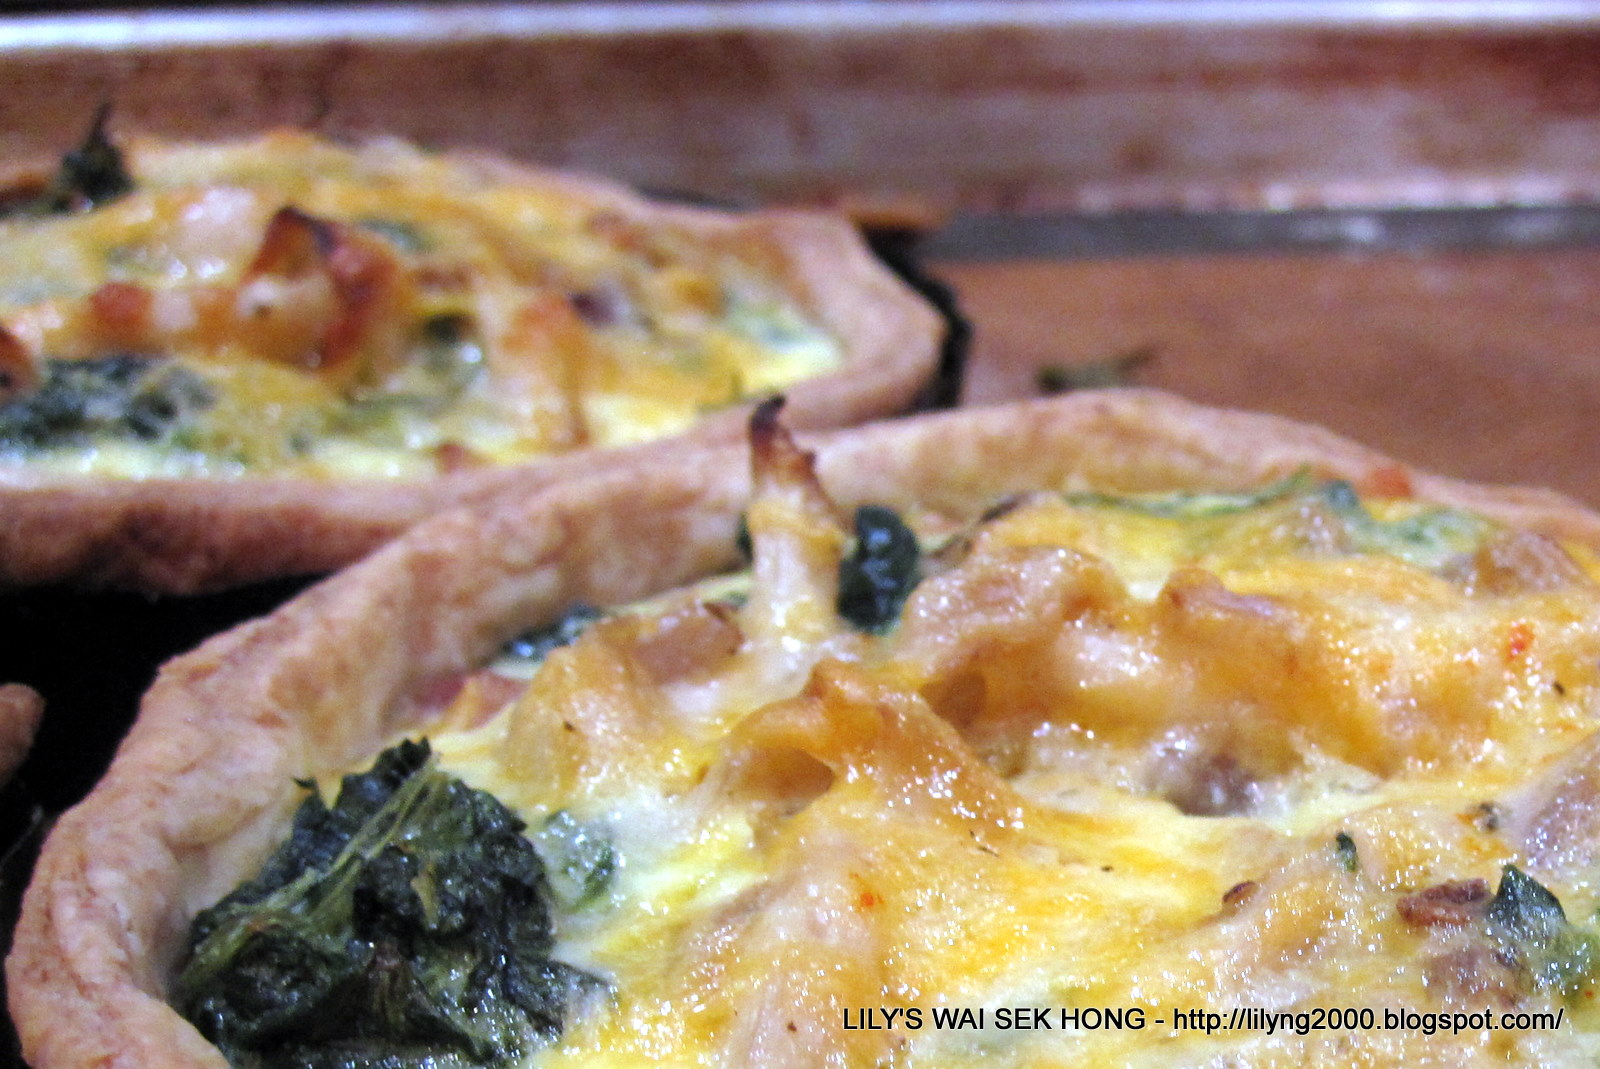
Spinach, Mushroom and Ham Quiche

When i visited Seatle last year, i took the opportunity to meet up with my dear friend, TT.  Although TT can be the son that i never had(how i wish), his knowledge in the culinary arena surpass mine by many folds.  Visit his blog Playing With My Food and you will understand what i mean.  When i met up with him for dim sum, he gave me this book -The Sweeter side of Amy's Bread"  and wished me well by writing this - To Lily - May you always be on the "Sweeter" side of life".  I was quite choked up with his wishes and when i feel down, i always kept  this in mind.  So, out with this book and made this Quiche.  This recipe is a keeper, thank you TT, if not for you, making this lovely recipe will not be possible.


Ingredients:


Whole Wheat Pastry Crust:

2/3 cup/5.15 ozx/146 gm unsalted butter, cut into 3/4 inch dice
5/8 cup + 1 tbsp/4 ozs/112 gm cream cheese
4 tbsp/1.83 ozs/52 gm ice water
2 1/2 apple cider vinegar
1 cup + 1 1/2 tbsp/5.60 ozs/158 gm unbleached all-purpose flour
1/2 cup/3.0 ozs/86 gm whole wheat flour
3/4 tsp kosher salt/1.2 tsp table salt
1/2 tsp baking powder

Method:

Freeze the diced butter and cream cheese for at least 30 minutes.  In a small cups or bowl, combined the iced water and the vinegar.

In a food proccesor fitted with the metal balde, combine the 2 flours, salt and baking powder and process them for 5 seconds until they are just combined. 

Add the frozen chunks of cream cheese and process again for 5 seconds or until the mixture looks like coarse meal.

Add the butter chunks and process again for 10 to 15 seconds until the largest pieces of butter are about the size of peas.

Transfer the mixture to a large bowl and sprinkle it with the ice water mixture. (If you don't have a food processor, mix the dry ingredients in a large bowl with a wire whisk and rub very cold, not frozen, cream cheese into the flour with your fingers until it looks like coarse meal..  Repeat the process with very cold, not forzen, butter chunks until the largest pieces of butter are about the size of peas.  If the butter starts to feel soft, freeze the mixture for 10 minutes before continuing.  Sprinkle the ice water mixture over the flour).  Using your hands, stir the mixture, pressing it together firmly until it forms. a cohesive ball of dough.  There should not be any pockets of dry crumbs remaining.  If necessary sprinkle in another 1 or 2 tsps of ice water.  Place the ball of dough on a large piece of plastic wrap, seal the wrap aaround the dough, and flatten the ball to make a round 3/4 inch thick disk.  Refrigerate for at least 30 minutes before rolling it out.  This dough may be kept refrigerated for up to 2 days or frozen for up to 6 months.

Ingredients for the Quiche 

1 tbsp + 1/2 tsp olive oil
One 8 oz package fresh mushroom, halved, cunt into 1/8 inch slices
1 cup ham diced very small
One 10 oz package frozen chopped spinach, thawed and drained
Salt and pepper to taste
3/4 cup onion - finely chopped
2 1/2 tsp garlic finely chopped

1 cup Monterey Jack cheese corarsely shredded

Custard Filling

1 1/2 cup/8.5 oz/240 gms half and half
5 large eggs
1/2 tsp kosher salt
A pinch of ground cayenne pepper

Method:

Position one rack in the middle of the oven, and preheat the oven to 400f. 

Line the 12 x 17 inch sheet pan with baking parchment. 

Remove the bottoms from the mini tart pans or a 9 or 10 inch tart pan and place bottomless pans on the prepared sheet pan.

Roll out the pastry on a lightly floured surface to a thickness of 1/8 inch.  Cut 6 circles of dough, each 6 1/8 inches in diameter.  Line each tart pan with a dough circle and blind bake the crusts(use coffee filters and topping with weights(i used beans)  for 20 minutes, or until they barely begin to brown.  Remove the weights and the paper and continue baking for 4 - 5 more minutes, until lightly browned and the bottoms are just starting to look a little dry.  Don't be concerned if the crust bottoms puff up slightly after the weights are removed, they should deflate again when they come out of the oven.

In a medium skillet or saute pan, heat 1/2 tsp of the olive oil and cook the mushrooms over medium heat with salt and pepper to taste, stirring occasionally until their water has been released and they start to brown 6 - 7 minutes.  Transfer the mushrooms to a large bowl and set aside.

Heat 1 tbsp of the olive oil in the pan and add the onions and garlic with a pinch of salt and pepper to taste and cook, stirring occasionally, until they become translucent, 2 - 3 minutes. 

Add the spinach and ham to the pan, sprinkle with salt and pepper to taste, and cook briefly until the spinach and ham are cooked through,  Transfer the mixture to the bowl with the mushrooms and mix it all together with a wooden spoon until everything is evenly distributed.  Let  cool slightly before mixing in the cheese.

To make the custard filling

In a large measuring cup or a 3 to 4 cup container with a pour spout, whisk together the half and helf , eggs, salt and cayenne pepper until well combined.

Five to 10 minutes after the crusts come out of the oven, with the tart pans still on the baking sheet, spread 1/3 cup of the spinach, mushroom, ham and cheese mixture evenly in the bottom of each tart shell.  If using a 9 - 10 inch tart pan - use all the mixture. 

Stir the custard and pour it over the spinach, filling each pan to within 1/8 inch of the top edge of the pastry.  Don't overfill the shells, or the custard will run out during baking.  It's not a total disaster if this happens.  The quiche will still be edible but there will be less filling in the shell.

Return the pan to the oven abnd bake for 20 - 25 minutes, or until the eges of the filling begin to puff up and the center still jiggles slightly when you shake the pan.  (The 9 - 10 inch tart pan might need a longer time to get custard to set).

Place the sheet pan on a wire rack to cool.  When cooled enough to handle, remove the quice from the pans.  Pans with filling that has run over may have to cool longer before the quiche can be extracted from the pans.

Serve slightly warm or at room temperature.

Leftovers may be regrigerated or frozen and reheated in a 400f oven for 20 minutes, or until heated all the way through.


Serves

Sunday, August 1, 2010

Mexicana Huevos

For 2 people:

Ingredients:
  • 4 eggs
  • 1 small red tomato (or half a biggger one) chopped (in cubes)
  • 1/4 white onion (finely chopped)
  • 1 or 2 chopped serrano peppers (serrano pepper is a hotter kind of pepper, you can use jalapeno or even green bell pepper if you want to avoid the heat, but serrano is the traditional pepper to use)
  • 2 tbsp vegetable oil
  • Salt to taste
Directions:

Add the oil to a pan, wait for the oil to warm up so you can sautee the vegetables, stir in the peppers and onions, sautee (season with salt). Once the onion is clear add the chopped tomato and fry a little bit longer (about 2 more minutes, until the tomato releases some of its juices), add the eggs and season with salt again, scramble the eggs and keep the eggs moving until they are cooked the way you like them.

I do not like eggs that are way too cooked (they shouldn't be dry, plus remember, the tomatoes will make it seem like the eggs are still too moist, but it's not the egg itself, it's the juice of the tomato)

Serve with refried beans, sliced avocado with salt (optional of course) and corn tortillas.


Provecho!

Paloma.

    Wednesday, July 28, 2010

    Ginger Milk Curd

    I have heard of this Ginger Milk Curd but did not have a chance to taste it until i managed to buy a ready mixed in the asian store here.  It was so easy to make, like making a cup of 3 in 1 coffee and i like the texture and taste very much.  In fact i love anything that has ginger.  Ginger has been my savior when digestion is concerned.  It has helped to rid of the huge bubble of gas build-up which has caused me alot of pain.  I decided to make this curd from scratch and after going through many recipes and know how from the net,  went ahead to make one bowl for myself.  At first, i doubted that it will set, how can just ginger juice and milk set? but it did.  The crucial part in this recipe is to have the milk in the correct temperature - 176f  - 165 f. This recipe is only for 1 small bowl, double or triple if you have to.

    Ingredients:

    150 ml whole milk
    1 tbsp ginger juice
    1 tsp sugar/sugar substitute


    Method:


    Grate ginger with a microplane grater and squeeze the juice through a strainer.  Measure 1 tbsp and leave in a small bowl.

    Measure 150 ml of whole milk and add in 1 tsp of sugar or sugar substitute.

    Microwave on high for 1 1/2 - 2 minutes to obtain the temperature of 176f - 186f.  Cooking time differs as microwave oven differs in wattage - know your microwave wattage.

    Stir the ginger juice, then pour the hot milk into the ginger juice and allow it to set.  Curd should set in 10 minutes.  A spoon rested on top of curd will not sink, then you know that the curd has set.

    ENJOY


    Serves

    Saturday, June 26, 2010

    Snail Buns


    These delicately flavored steamed buns are so named because they are shaped like snails. They are often deep-fried until golden brown after having been steamed. Either way, snail buns are excellent as a subsitute for rice. This recipe defers slightly from 'Flower Buns' and has less ingredients and the texture is just as soft.


    Ingredients:

    Basic Yeast Dough:

    1/4 cup sugar
    2 cups water
    2 tsp instant yeast
    6 cups unbleached all purpose flour
    2 tbsp shortening
    2 tsp double action baking powder plus 1 tsp water


    Snail Buns:

    1 recipe of basic yeast dough
    1/4 cup melted lard plus 1/4 cup melted butter plus 1/2 cup sugar(creamed to a paste)
    1/4 cup minced cooked ham or grated carrot and /or chopped spring onions

    Method:

    Basic Yeast Dough :

    Mix all the ingredients except the baking powder, to a rough dough, turn the mixture out onto a lightly floured surface and knead for 8 - 10 minutes, until the dough is smooth and elastic. (if it is very sticky, knead in 1/4 cup additional flour - the dough should be soft)

    Lightly grease a bowl with oil and place the dough in the bowl. Turn it so that all sides of the dough are coated.

    Cover the bowl with a damp cloth and let the dough rise for 4 hours in a warm area, free from drafts.

    Uncover the dough, punch it down and turn it out onto a lightly floured surface.

    Flatten the dough and make a well in the center. Place the baking powder solution in the well and gather up the edges around the baking powder to enclose it. Pinch the edges to seal.

    Lightly knead the dough to incorporate the baking powder evenly.

    Note:

    The dough should be used immediately. If that is not possible, punch down the dough after the 4 hours rise, cover with plastic wrap and refrigerate until ready to proceed.


    Snail Buns:
    Prepare the basic yeast dough as directed and cut it in half.

    On a lightly surface, roll out each half to form a rectangle approximately 10 by 14 inches and 1/6 inch thick. Spread the surface of one rectangle with half the lard, butter and sugar mixture.

    Starting with one of the long exges, roll up the rectangle jelly-roll-style. Pinch the two ends to seal the dough; lightly flatten the roll with the heel of your hand. Cut the roll crosswise into thin shreds. Separate the shreds into 15 groups, and let them rest.


    Repeat the process for the other rectangle.

    Gather up each group of shreds, and lightly stretch, wrapping them Maypole-style around your index finger and thumb. Tuck the end underneath to secure.

    Repeat the procedure for all the shreds and arrange the shaped buns 1 inch apart on several steamer trays that have been lined with wet cheesecloth or with parchment paper punched with holes.

    Sprinkle the tops with the minced ham or grated carrot and/or chopped spring onions, and let the buns rise for 15 minutes, covered.

    Fill a wok with water level with the bottom edge of a steamer tray and heat until boiling. Place one tray of buns over the boiling water, cover, and steam for 15 minutes over high heat.

    Remove, and steam the remaining buns in the same manner.


    To reheat, steam the buns for 5 minutes over high heat.

    Serves

    Friday, June 18, 2010

    Spam Musubi

    In Hawaii, Spam musubi, a tradition of Japanese onigiri,  is a very popular snack   Spam musubi is composed of a block of rice, be it jasmine or sushi rice,  with a slice of grilled spam(luncheon meat can be used, then the snack will be called Luncheon Musubi) on top and nori (seaweed) wrapping to hold it together. There are no fast rules to making this yummy snack except for the 3 main ingredients, cooked rice, Spam and Nori.  The sauce is of your own choice and if you are like me, i like mine naked - meaning 'no sauce' cos i find that the Spam is flavorful enough, in fact too salty.  A musubi mould would be good to have but until i visit Hawaii to get one, i will have to continue to make my musubi with a homemade improvised mould - an empty small can of Spam with both ends removed and a thick cardboard cut to the size of the can, covered with several layers of aluminium foil to be used as a press. A word of caution, the edges of the bottom of spam can is very sharp, so neaten sharp edges and use with caution.   I love making spam musubi for breakfast cos it is fast to make.  You know - asian household -  i always have leftover cooked rice and i will just heat it up in the microwave.  I even use the microwave to brown my slices of Spam - no washing of pans.  Yes, in a jiffy you can assemble and a sumptous breakfast/snack can be served.


    Ingredients:

    5 cups cooked sushi rice/jasmine rice, room temperature
    5 sheets nori, cut in half lengthwise
    1 (12 oz.) can Spam
    Furikake(optional), to taste

    Sauce:
    6 tbsp soy sauce
    4 tbsp mirin
    4 tbsp sugar


    Method:Cut Spam into 10 slices. Fry until slightly crispy. Remove and drain on plate lined with paper towels.

    To make the sauce, in another pan, combine soy sauce, mirin and sugar. Bring to a boil over medium-high heat, then reduce to low. Add Spam slices, coating them in the mixture. When mixture has thickened, remove Spam from pan.

    To assemble, lay a sheet of nori lengthwise on a clean surface. Moisten lower half of musubi mould and place on lower third of nori. Fill musubi mould with rice and press rics flat until the rice is 3/4-inch high(this height is desirable but it does not matter, if you have put in more rice, then the height will be taller -  no rocket science). Sprinkle rice with furikake if using. Top with slice of Spam. Remove musubi mould with the press still on top of Spam,  keep in a bowl of warm water to keep it clean and moist.


    Starting at the end towards you, remove the press and  fold nori over Spam and rice stack, and keep rolling until completely wrapped in the nori. Slightly dampen the end of the nori to seal it.

    Repeat with the other nine Spam slices, making sure to rinse off musubi maker after each use to prevent it from getting too sticky.

    Wednesday, June 16, 2010

    Glutinious Rice Roll

    Today is the 5th Day of the Fifth Moon following the Lunar Calender and today is the day of the 'Chung/Rice Dumpling Festival'.   I had wanted to make  some 'chung'  but due to unforeseen circumstances was not able to make some - excuses - excuses!!!  But...... since i do have leftover Law Mei Farn which is a very good filling for these Rolls.  These rolls are so much easier and faster to make and I am pleased that i have kept half the tradition by having glutinious rice served today but in another form.  You can follow any pau dough recipe or follow the one below.


     Ingredients:

    Pau Dough:

    2 cups pau flour(if all-purpose flour is used - add more water to make into a soft dough)
    3/4 cup wheat starch
    2 tsp baking powder
    3/4 cup powdered/confectioner's sugar
    1 1/2 tbsp shortening/lard
    1 tsp instant yeast
    2/3 cup water(adjust according)
    1/4 tsp vinegar

    Filling:

    1/2 recipe of Law Mei Farn

    Method:

    To make pau dough:

    Put flour, wheat starch, baking powder, powdered sugar and yeast in the food processor and pulse a few times to mix ingredients well..

    Add in shortening/lard and pulse until well mixed.

    Add vinegar to the water and pour into flour mixture with the food processor on,  Mix until a soft ball forms - water has to adjusted, adding more a little at a time, to make dough into a very soft and pliable dough.

    Remove from food processor and knead until smooth, then leave to proof until double it's size.

    To assemble:

    Roll the 'law mei farn' into a 2 inch log.

    Punch down the pau dough and roll into a rectangle that is big enough to wrap the law mei farn log.

    Wrap the law mei farn log with the pau dough rectangle and pinch the seam well.

    Cut the log into 1 1/2 inch pieces and put a piece of greaseproof paper underneath every piece. Leave rolls to proof again before steaming.  Pau dough should feel puffy and if touched lightly, the dough should not spring back and the dent remained)

    Bring the water in the steamer to a very high boil and steam pau rolls for 8 - 10 minutes.

    Serve hot

    Serves

    Saturday, June 12, 2010

    Fantastic for Breakfast : French Toast


    A fun traditional breakfast entree , French Toast makes an easy and welcome dinner also, especially for kids. Top the toast with yogurt, jam and powdered sugar and serve along with big glass of orange juice will leave you smiling for the rest of the day.

    Photo Sharing and Video Hosting at Photobucket

    Ingredients:

    1/3 cup Whole milk
    2 Large eggs
    1 tbsp Sugar
    1/2 tsp Vanilla
    1/4 tsp Salt
    3 slices White or egg bread
    1 tbsp Butter


    Method:

    In a shallow bowl, whisk together milk, eggs, sugar, vanilla and salt.

    Melt butter in large frying pan on medium heat.

    Dip bread in egg mix, turning to coat each side.

    Cook bread in frying pan until underside is golden, then turn and cook until reverse is golden.

    Serve immediately.

    Alternatively:

    Use the sandwich toaster then the butter can be omitted.

    Serves


    Saturday, June 5, 2010

    Breakfast & Dessert : Banana Cake

    How lucky Malaysians are with so many types of bananas to choose from. The unforgetable Rastali and Pisang Emas are a must to eat when you are in Malaysia. Pisang Emas is more friendly than Rastali, which is best eaten when it is perfectly ripened. Here in the States, bananas in the regular supermarkets are of the 'Sweet William/Cavendish' variety - one and only - no choice. But, now and then, Baby Bananas which is Pisang Emas is being sold. When i see them on the shelf, i will not hesitate to get a bunch, no matter how much it will cost. The asian stores in Chinatown Denver, do sell Baby Bananas, but they don't seem to look good at all. I have always wondered if there is a difference in the taste of the cake made with Cavendish bananas compared to a cake made with Baby Bananas/Piisang Emars. Since i have several baby bananas which were over-riped, i decided to try out this recipe of Florence from Do What I like, and thank you Florence, this recipe is a keeper and the pisang emas does make a difference to the taste of the cake.


    Ingredients:

    200g cake flour
    3/4 tsp baking powder
    1/2 tsp baking soda)Friends from sea-level, use 3/4 tsp)
    50g unsalted butter at room temperature
    25ml corn oil
    80g - 100g sugar(i use 80 g and it is just the right sweetness)
    2 eggs lightly beaten
    210g banana puree with 10ml lemon juice
    60ml milk
    A pinch of salt
    A drop of banana essence
    60g walnuts (optional)


    Method:

    Sieve flour, baking powder, baking soda and salt.

    Cream butter, corn oil and sugar till smooth and creamy.

    Add in the lightly beaten eggs 1/4 at a time till well blended.

    Add in the banana puree and the essence.

    Add in the 1/3 of the sieved flour and half the milk. Repeat and end with the last third of the sieved flour..

    Stir in the walnuts if you are using.
    Bake in a lined loaf pan or 2 small lined loaf pans at a preheated oven of 350f for 45 - 60 minutes


    Serves