Showing posts with label Snacks. Show all posts

Tuesday, July 13, 2010

Yummy Ginger Snack


Ginger needs no introduction to Asians, it can be condsidered as one of 'The Ancient Chinese Secret' for it's Medicinal Properties. To those who do not cook or use as much Ginger and would like to know more about it, this is worth reading The Epicentre - Ginger

I grew up with these type of dried, cured snacks and ginger is still my favorite.

In my younger years, these snacks will be sold only at the corner stall but now, there is a whole shop selling all sorts of which the choice is endless, some of them are not even recognizable as to what fruit or vegetable they are made from but they all tasted so good. I don't know why we as kids could not come up with nicer names for these snacks but always associated them with something unpleasant. I am sure many will know - Yeong mare see or Ngau see thoi which is in cantonese and for those who don't understand cantonese, you won't want to know.
Ginger snacks come in different tastes, there is a sweet or a salty type and both of these types will be colored red, They will be in bits or chunks and slices are normally soaked in vinegared syrup, like the ones served with Sushi. This Ginger snack which i made is from very thin slices and it is easy, so give this recipe a try.


Ingredients:

Fresh ginger preferably younger ones - they are less spicy
1 cup plus 1/2 cup sugar
More sugar for coating

Method:

Scrape the skin off the ginger knobs and slice thinly using the mandoline.

Cook sugar and water until sugar dissolves.

Add in the ginger slices and cook for a minute or two. The longer you cook the ginger slices, the less spicy they will be.

Remove ginger slices from the syrup and drain. The syrup can be diluted with iced/warm water to make a delicious drink or added to your cup of tea.

Coat the ginger slices in sugar and lay them in single layer on a cake rack and put to dry in the sun.

When dried, ginger slices are ready to be enjoyed.

Store in air-tight container.


Serves

Saturday, June 26, 2010

Snail Buns


These delicately flavored steamed buns are so named because they are shaped like snails. They are often deep-fried until golden brown after having been steamed. Either way, snail buns are excellent as a subsitute for rice. This recipe defers slightly from 'Flower Buns' and has less ingredients and the texture is just as soft.


Ingredients:

Basic Yeast Dough:

1/4 cup sugar
2 cups water
2 tsp instant yeast
6 cups unbleached all purpose flour
2 tbsp shortening
2 tsp double action baking powder plus 1 tsp water


Snail Buns:

1 recipe of basic yeast dough
1/4 cup melted lard plus 1/4 cup melted butter plus 1/2 cup sugar(creamed to a paste)
1/4 cup minced cooked ham or grated carrot and /or chopped spring onions

Method:

Basic Yeast Dough :

Mix all the ingredients except the baking powder, to a rough dough, turn the mixture out onto a lightly floured surface and knead for 8 - 10 minutes, until the dough is smooth and elastic. (if it is very sticky, knead in 1/4 cup additional flour - the dough should be soft)

Lightly grease a bowl with oil and place the dough in the bowl. Turn it so that all sides of the dough are coated.

Cover the bowl with a damp cloth and let the dough rise for 4 hours in a warm area, free from drafts.

Uncover the dough, punch it down and turn it out onto a lightly floured surface.

Flatten the dough and make a well in the center. Place the baking powder solution in the well and gather up the edges around the baking powder to enclose it. Pinch the edges to seal.

Lightly knead the dough to incorporate the baking powder evenly.

Note:

The dough should be used immediately. If that is not possible, punch down the dough after the 4 hours rise, cover with plastic wrap and refrigerate until ready to proceed.


Snail Buns:
Prepare the basic yeast dough as directed and cut it in half.

On a lightly surface, roll out each half to form a rectangle approximately 10 by 14 inches and 1/6 inch thick. Spread the surface of one rectangle with half the lard, butter and sugar mixture.

Starting with one of the long exges, roll up the rectangle jelly-roll-style. Pinch the two ends to seal the dough; lightly flatten the roll with the heel of your hand. Cut the roll crosswise into thin shreds. Separate the shreds into 15 groups, and let them rest.


Repeat the process for the other rectangle.

Gather up each group of shreds, and lightly stretch, wrapping them Maypole-style around your index finger and thumb. Tuck the end underneath to secure.

Repeat the procedure for all the shreds and arrange the shaped buns 1 inch apart on several steamer trays that have been lined with wet cheesecloth or with parchment paper punched with holes.

Sprinkle the tops with the minced ham or grated carrot and/or chopped spring onions, and let the buns rise for 15 minutes, covered.

Fill a wok with water level with the bottom edge of a steamer tray and heat until boiling. Place one tray of buns over the boiling water, cover, and steam for 15 minutes over high heat.

Remove, and steam the remaining buns in the same manner.


To reheat, steam the buns for 5 minutes over high heat.

Serves

Friday, June 25, 2010

Sweet Potato Ku


These are before steaming


These are after steaming

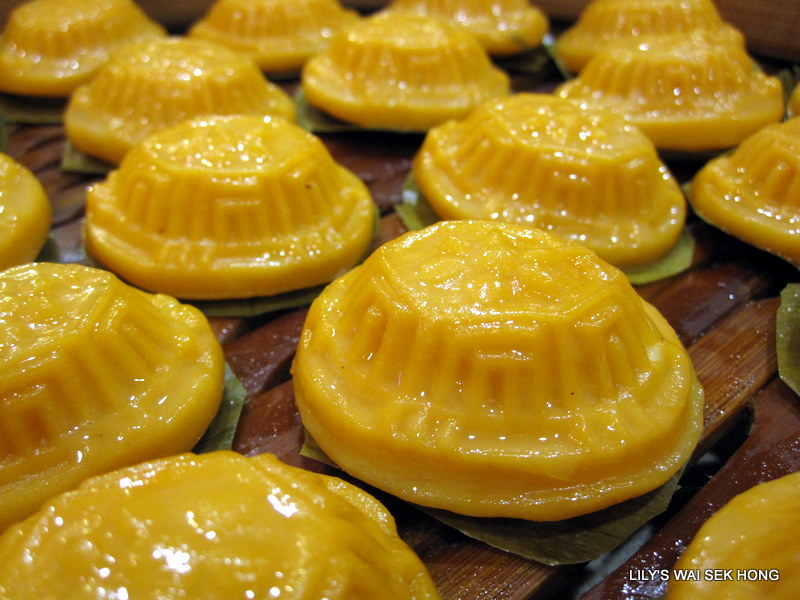
I cannot be any happier that these 'ku' turned out exceptional beautiful.  The color was so  natural and sweet, of course it was - no food coloring added - the culprit was orange sweet potato/yam.  The filling is the usual mung bean - oh oh i have a story to relate about this filling, yes this particular bag of mung bean filling.  It was a leftover from one of our cooking sessions(a group of us ladies gather every sunday and we cook and bake). So, one sunday, I was the first to arrive at Nellie's and Nellie went through her freezer and pulled out this bag, she asked if i wanted to eat durian.  Of course i said yes, and we had to defrost it fast before the other ladies turn up, there won't be enough to go around. the durian looked so good, yellowish and looked seedless too.  So, into the microwave it went for defrosting.  After a minute of two, the bag came out of the microwave, Nellie and I laughed until tears came down and me with my incontinense, had to rush to the rest room - It was not durian but a bag of mung bean filling.  The moral of the story was, we were bad hearted, we did not want to share and we got none too. I have learned my lesson and am sharing the mung bean filling with those who turned up for dinner last weekend. Hope they liked these cute bite-size 'ku'.


Ingredients:

For the dough:

150 gm orange sweet potato/yam - mash immediately after steaming and keep it hot.
150 gm glutinious flour
50 ml thick coconut milk
50 ml hot boiling water
1/4 tsp salt
2 tbsp cooking oil

Filling:

Follow the recipe from Angkoo Ah Mah Chew


Method:

Mix the glutinous rice flour, salt and coconut milk to the hot mashed sweet potato.  Knead until dough does not stick to your hands - slightly on the wet side, it will dry out after resting.  If the dough is soft and pliable, do not add in the water.   Lastly add in oil and knead lightly till dough is shiny. Rest dough for at least 1 hr.

Scale the filling and dough according to the size of the mould.  Flatten it and wrap in a filling.  Seal and shape into a round/  Dust the mould with a little glutinious rice flour.  Press firmly into the mould  Knock and dislodge from mould.  Place on oiled banana leaf.  Continue process with the rest of the dough pieces.

Use tap water and wash off excess glutinious rice flour from the surface.  Do it quickly and lightly before steaming the 'ku' over LOW heat for 5 - 10 minutes. Remove the steamer lid after 5 minutes to lower the heat as the pattern will not be as sharp if the heat is too high.  Remove from steamer and brush with oil for a  shiny surface.


 Serves

Friday, June 18, 2010

Spam Musubi

In Hawaii, Spam musubi, a tradition of Japanese onigiri,  is a very popular snack   Spam musubi is composed of a block of rice, be it jasmine or sushi rice,  with a slice of grilled spam(luncheon meat can be used, then the snack will be called Luncheon Musubi) on top and nori (seaweed) wrapping to hold it together. There are no fast rules to making this yummy snack except for the 3 main ingredients, cooked rice, Spam and Nori.  The sauce is of your own choice and if you are like me, i like mine naked - meaning 'no sauce' cos i find that the Spam is flavorful enough, in fact too salty.  A musubi mould would be good to have but until i visit Hawaii to get one, i will have to continue to make my musubi with a homemade improvised mould - an empty small can of Spam with both ends removed and a thick cardboard cut to the size of the can, covered with several layers of aluminium foil to be used as a press. A word of caution, the edges of the bottom of spam can is very sharp, so neaten sharp edges and use with caution.   I love making spam musubi for breakfast cos it is fast to make.  You know - asian household -  i always have leftover cooked rice and i will just heat it up in the microwave.  I even use the microwave to brown my slices of Spam - no washing of pans.  Yes, in a jiffy you can assemble and a sumptous breakfast/snack can be served.


Ingredients:

5 cups cooked sushi rice/jasmine rice, room temperature
5 sheets nori, cut in half lengthwise
1 (12 oz.) can Spam
Furikake(optional), to taste

Sauce:
6 tbsp soy sauce
4 tbsp mirin
4 tbsp sugar


Method:Cut Spam into 10 slices. Fry until slightly crispy. Remove and drain on plate lined with paper towels.

To make the sauce, in another pan, combine soy sauce, mirin and sugar. Bring to a boil over medium-high heat, then reduce to low. Add Spam slices, coating them in the mixture. When mixture has thickened, remove Spam from pan.

To assemble, lay a sheet of nori lengthwise on a clean surface. Moisten lower half of musubi mould and place on lower third of nori. Fill musubi mould with rice and press rics flat until the rice is 3/4-inch high(this height is desirable but it does not matter, if you have put in more rice, then the height will be taller -  no rocket science). Sprinkle rice with furikake if using. Top with slice of Spam. Remove musubi mould with the press still on top of Spam,  keep in a bowl of warm water to keep it clean and moist.


Starting at the end towards you, remove the press and  fold nori over Spam and rice stack, and keep rolling until completely wrapped in the nori. Slightly dampen the end of the nori to seal it.

Repeat with the other nine Spam slices, making sure to rinse off musubi maker after each use to prevent it from getting too sticky.

Saturday, June 12, 2010

Fantastic for Breakfast : French Toast


A fun traditional breakfast entree , French Toast makes an easy and welcome dinner also, especially for kids. Top the toast with yogurt, jam and powdered sugar and serve along with big glass of orange juice will leave you smiling for the rest of the day.

Photo Sharing and Video Hosting at Photobucket

Ingredients:

1/3 cup Whole milk
2 Large eggs
1 tbsp Sugar
1/2 tsp Vanilla
1/4 tsp Salt
3 slices White or egg bread
1 tbsp Butter


Method:

In a shallow bowl, whisk together milk, eggs, sugar, vanilla and salt.

Melt butter in large frying pan on medium heat.

Dip bread in egg mix, turning to coat each side.

Cook bread in frying pan until underside is golden, then turn and cook until reverse is golden.

Serve immediately.

Alternatively:

Use the sandwich toaster then the butter can be omitted.

Serves


Wednesday, June 2, 2010

Macha/Green Tea Chiffon Cake


I remembered there was a request for Green Tea Chiffon but have not responded until now as i finally got some green tea meant for baking.  This time the cake is green unlike the green tea kasutera which was slightly brown.  This recipe makes a smaller chiffon cake and if you prefer a taller cake, use a 12 cup chiffon cake tube mould and double the recipe.  The green tea is not overpowering, it is just there to tease your palate.  The tablespoon of honey added made the cake moist. 


Ingredients:A:

1 cup sifted cake flour (sift the cake flour, then measure a cup, otherwise use the scale - 100 gm)
3/4 tsp baking powder
1/8 tsp salt
4 egg yolks
1 tbsp honey
2 1/4 tbsp fine granulated sugar
4 tbsp warm oil (microwave for 30 seconds)
1 tbsp green tea powder (Matcha powder)
1/3 cup hot water (or hot milk)


6 egg whites
3 tbsp fine granulated sugar
1/2 tsp cream of tartar


Method:

Preheat oven to 350 f for convection, 325 f for convention and for friends at sea-level - 325 f. 

Dissolve green tea powder and honey in hot water (or hot milk).
Combine cake flour, baking powder and salt  and sieve for at least 3 times.

Whisk egg yolks, then stir in sugar and whisk until sugar dissolves. Add warm oil, green tea mixture, and sift in cake flour mixture. Combine and stir well.

Using an electric mixer, beat egg whites and cream of tartar in medium speed until foamy .  Add in the sugar and continue to whisk until thick and in a soft stiff peak.

Temper a 1/3 of egg whites into the batter and mix in well.

Gently incorporate the rest of the egg whites with a rubber spatula by folding in. . Don’t beat or stir too hard, just fold and combine well.

Transfer mixture to cake mould. Run a spatula or butter knife all over the batter to remove air pockets.

Bake on the lower rack in preheated oven for 35 to 40 minutes. Test for doneness.

Remove from oven and invert the mould immediately. Let the cake cool completely. (i like to use a metal funnel and let the tube rest on it)

When cake is cooled, use a knife to run around the edges of mould and take out the cake carefully.

Monday, May 31, 2010

Hong Kong Egg Tarts

I love Dim Sum and would love to go 'Yum Cha' which is our term for having a meal in the Dim Sum Restaurant, in any cities i visit.  Egg Tarts are one of the favorites to order.  The Egg Tarts served in most Dim Sum Restaurants are made with flaky pastry and they are so well baked with perfection, the pastry so light and flaky, the custard is smooth and sweet..  I have tried baking them but found it very challenging.  Have not been happy with my results and am still trying.  And, until i make some good flaky pastry egg tarts,  these Hong Kong  Egg Tarts which has shortcrust pastry, were accepted with glee by Renee,  she ate these in Hong Kong and loved them.


Ingredients:

Crust:

8 ozs all-purpose flour
2 ozs powdered/confectioner's sugar
a pinch of salt
4 1/2 ozs chilled butter - cut into 1/2 inch cubes
1 large egg, lightly beaten
1/4 tsp vanilla extract

Custard Filling:
3 large eggs
4 ozs fine granulated sugar (take away 1 tbsp for lesser sweetness)
225 ml  hot water
3 fl ozs evaporated milk
1/2 tsp vanilla extract
2 drops of yellow yolk food coloring


Method:
 
To Make The Crust:
 
Put all-purpose flour, powdered sugar and salt into the food processor and pulse to mix.
 
Add in chilled cubed butter and pulse until fine breadcrumb like.
 
Add vanilla extract to beaten egg and then add into flour mixture with the machine running and stop machine as soon as the dough is formed.  Do not overmixed.
 
Remove and wrap dough with plastic wrap and leave in the fridge for at least 30 minutes before using.
 
To Make the Filling:
 
Put sugar and water in a microwave-safe bowl and cook on high for 1 to 1/2 minutes and stir until sugar dissolves.
 
Add in evaporated milk, food coloring and vainlla, stir well.
 
Beat eggs lightly and add in to the above.
 
Pass through a very fine sieve, then fold a piece of kitchen towel into a strip and then run it over the top of the egg mixture to remove the bubbles.
 
Leave aside while you prepare the tarts.
 
To prepare the tarts:
 
Grease the tart moulds lightly.
 
Remove chilled dough, knead lightly and divide into small pieces(for my tart moulds, i use 3/4 oz).
 
Form dough into a tiny disk that will fit the base of the mould, then using the thumb, press dough so that it comes up the side of the mould.  Dough can be slightly higher than the mould but not too much - higher will allow more room for more filling but if too high, it will form a lip as this dough recipe is very soft.)
 
Repeat until all the tart moulds are formed.  Formed tart moulds can be kept in the fridge well wrapped until you need to bake them.
 
Preheat oven to 450 f and put the rack to the lowest rung of the oven.(Friends at sea-level can bake @ 400f)
 
Fill the formed tart moulds with egg filling to slightly lower than the rim, do not overfill.
 
Bake @ 450f for 10 mins and then lower the lower the heat to 400 f(sea-level @ 375 f) for another 15 minutes.  Baking time differs from the size of the tart moulds, so visual monitoring is important.  The crust has to be browned and the custard should not be overcooked.  The custard will puff slightly - yes slightly, then it is a sign for doneness,  you might have to remove some of the tarts which will cook faster than the rest as there are hot spots in most oven.  If  the custard puffs up and the crust is not brown enough, the oven door can be opened and left ajar for a while to lower the temperature in the oven, then it can be closed to finish the baking) 
 
Good luck and enjoy.
 
 
Serves

Saturday, May 22, 2010

Horse's Hoof/Mah Keok

This is another spin-off from Hum Cheem Paeng.  This is a cousin of The Butterfly and Ox Tongue.  I have always thought that Horse's Hoof and Ox Tongue is the same but looking at the recipes for Ox Tongue,  i can see a difference.  Al;though the shape is the same, Ox Tongue has a sweet filling.  When i was back home last month, my dearest friend, Nancy, who still resides in Seremban, took me to the best YCK stall there and i stood there watching how YCK, Hum Cheem Paeng, Kap Chong and a new shape which i shall call = Seremban Butterfly were formed.  Forming all these were so easy for the stall owner and i would never imagine that they were done this way, if i had not watched him rolling, dusting and frying away.  I will have to do a batch of Seremban Butterfly before i forget how it is formed


Ingredients:

1 recipe of Hum Cheem Paeng II
Sesame seeds

Glaze:

1 tbsp all purpose flour
1 tbsp cornflour
3 tbsp sugar
60 ml water

Method:

Roll Hum Cheem Paeng dough into a 1/2 inch thickness rectangle with one side which is 8 inches.

Spread the glaze all over the rectangle and sprinkle sesame seeds on top.  Cover with cling-wrap and roll lightly over the sesame seeds so that it will adhere to the dough.

Fold the rectangle into half making a 4 inch side rectangle.

Cut into 1 inch slices and pinch the two ends to look like the Horse's Hoof.

Deep fry in moderately hot oil until golden brown.
Remove and place to drain on a  cake rack which is on top of a lined baking sheet.

Serves

Thursday, May 20, 2010

Chinese Doughnut With Glutinious Rice

I love glutinious rice and also Hum Cheem Paeng/Chinese Doughnut, so a combination of these two satisfy my craving at one go, how wonderful.  But, what are they called in chinese?  I thought it is called 'Kap Sum Choong'  but my dear friend, Peng, said it is called ' Kap Choong'.  I know that someone out there knows the name.  Help!!!!!


Ingredients:

1/2 recipe of Hum Cheem Paeng II
1 cup glutinious rice - soaked
2 tbsp sugar
1 tsp salt

Method:

Put the soaked glutinious rice, sugar, salt and enough water to come to just above the rice, in the rice cooker and cook rice until done.

Remove and let cool slightly.  While still warm, form into a log.

Roll the hum cheem paeng dough out into a rectangular shape, the length of the glutinious rice log, the width should be just enough to wrap up the glutionious log.  Pinch the seames tightly to seal.

Cut into 3/4  - 1 inch pieces and roll each piece out slightly and form them back into shape.

Dust away as much bench flour as possible before deep frying.

Deep fry on medium heat and keep turning hum cheem paeng for even browning.

Enjoy.

Serves

Tuesday, May 18, 2010

Indonesian Snack : Rempeyek


I have always wanted to make this Indonesian snack which i thought needed a mould but when i found out that it can be made without it, i made it and it was very successful. A small wok is needed and so a little oil too and one rempeyek is made at a time, it may sound tedious, but it was worth it. To obtain a nice even round piece, the oil must not be too hot. A piece is fried until it has set and it has to finish browning in the oven, which is a very good step, as the baking browns and remove excess oil. I would prefer to partly roast the peanuts as i find that using raw ones, some are not thoroughly cooked through.


Ingredients:
125 g rice flour
1 tsp salt
2 tsp sugar
1 tsp coriander powder
1/2 tsp whole cummin seeds
1/2 tsp whole fennel seeds
2 - 3 tbsp soaked, pounded ikan bilis
1/2 cup coconut cream
1/2 cup water
1/2 cup vegetable oil
1/2 partially roasted peanuts


Method:
Mix all the ingredients together except for the peanuts and leave batter to rest for at least 10 minutes.
Heat oil in a small wok until it is less than moderately hot, ladle a scoop of batter, add some peanuts to the batter.
Pour batter into oil in a circular motion, let batter set before turning to fry the other side. Snack can be removed as soon as it has hardened, need not to be golden brown cos it has to be browned in the oven.
Repeat making the snacks and when all is done, brown in a 350f oven until they are golden brown and crispy.
Enjoy