Showing posts with label Festivals Dishes. Show all posts

Thursday, July 1, 2010

Barbecue Pork Ribs

This weekend, sit back, and savor America's freedoms with the simplicity of time-honored traditions and have a Barbecue. A July 4th Barbecue is not the same without ribs and this recipe is simple producing tender and juicy ribs without the long hours on the grill.  Although prep is tedious, it is worth the effort.  This recipe is adapted from  Bobby Chinn - Wild, Wild East.  The recipe calls for steaming the ribs and i used the pressure cooker which cut the steaming time by half. I did not brine as the ribs were fatty enough and the meat would not dry out besides like the saying goes - the nearer the bone, the sweeter the meat and don't need any brining.. 

Ingredients:

2 1/4 lb baby back pork ribs or St Louis Cut Pork Ribs

Dry Rub:

1/3 cup brown sugar
1 tbsp ground paprika
1 1/2 tbsp garlic salt
1 tbsp freshly ground black pepper
1 tbsp onion powder
1 tbsp mustard powder
1/2 tsp ground dried sage
1/4 tsp dried thyme
1 tbsp chilli powder
1/2 tsp cayenne pepper

Vinegar-based Barbecue Sauce:

1/2 cup cider vinegar
1 cup apple juice
5 tbsp tomato ketchup
5 tbsp molasses
2 - 3 tbsp crushed red pepper(to taste and optional)
Freshly ground black pepper

For the smoking:

Raw Rice
Sugar
Black Tea

Method:

To make the dry rub, combine all the ingredients well.  Store in an air-tight container for use as required.

To make the sauce, combine the ingredients in a saucepan.  Bring to a boil, then reduce the heat and simmer for about 20 minutes. While the sauce is cooking, throw in about half the dry rub.  It is pretty much up to you how much you use.

Clean the ribs and trim off excess fat.  Cut each rack in half. 

Put in about an inch of water in the pressure cooker and place a steamer rack on it.  Place the ribs on top of rack and close lid of pressure cooker.  Pressurized for 15 - 20 minutes until ribs are cooked through and tender.  I cook them until tender enough to pull the bone from the meat freely. 

Rub the surface of the ribs with the remaining dry rub - ready for smoking.

To smoke the ribs:

Line the wok with aluminium foil to prevent ingredients sticking and burning against the wok's surface
Arrange the smoking ingredients on the bottom of the wok.
Place a circular wire rack on top of the smoking ingredients
Place the tender ribs on top of the wire rack
Place the wok lid on top of the wok and seal with damp towels.
Heat the wok. As the wok commences to heat,  the rice, sugar and tea will begin to burn, filling the wok with flavoured smoke. The ribs will bake and at the same time become flavoured by the smoke.
Smoke for 20 minutes.

To grill:

Heat the grill and cook smoked ribs for about 4 minutes on each side.


To Serve

Place the cooked ribs on a cutting board, sprinkle about a tablespoon of dry rub over them and chop through every 2 ribs.

Drizzle some sauce on top of the ribs and serve.

Enjoy and have a Good July 4th Weekend!!!!!!

Friday, June 25, 2010

Sweet Potato Ku


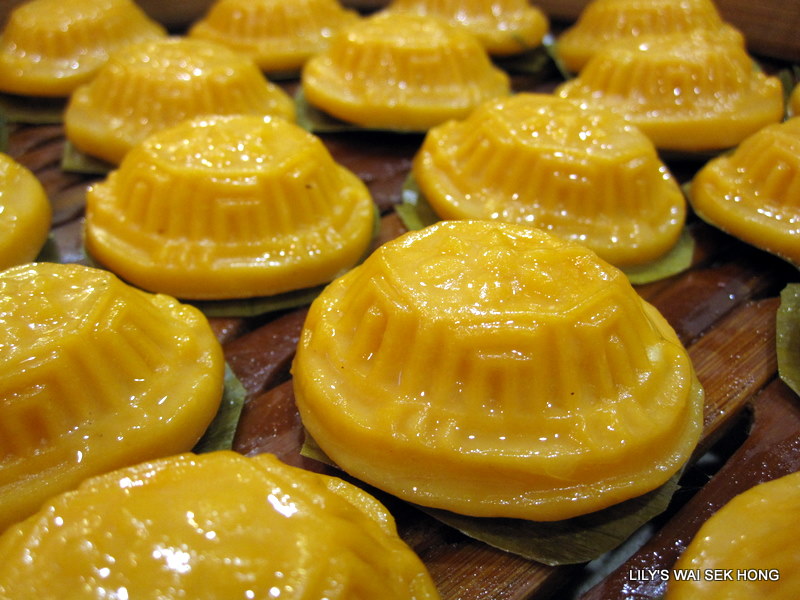
These are before steaming


These are after steaming

I cannot be any happier that these 'ku' turned out exceptional beautiful.  The color was so  natural and sweet, of course it was - no food coloring added - the culprit was orange sweet potato/yam.  The filling is the usual mung bean - oh oh i have a story to relate about this filling, yes this particular bag of mung bean filling.  It was a leftover from one of our cooking sessions(a group of us ladies gather every sunday and we cook and bake). So, one sunday, I was the first to arrive at Nellie's and Nellie went through her freezer and pulled out this bag, she asked if i wanted to eat durian.  Of course i said yes, and we had to defrost it fast before the other ladies turn up, there won't be enough to go around. the durian looked so good, yellowish and looked seedless too.  So, into the microwave it went for defrosting.  After a minute of two, the bag came out of the microwave, Nellie and I laughed until tears came down and me with my incontinense, had to rush to the rest room - It was not durian but a bag of mung bean filling.  The moral of the story was, we were bad hearted, we did not want to share and we got none too. I have learned my lesson and am sharing the mung bean filling with those who turned up for dinner last weekend. Hope they liked these cute bite-size 'ku'.


Ingredients:

For the dough:

150 gm orange sweet potato/yam - mash immediately after steaming and keep it hot.
150 gm glutinious flour
50 ml thick coconut milk
50 ml hot boiling water
1/4 tsp salt
2 tbsp cooking oil

Filling:

Follow the recipe from Angkoo Ah Mah Chew


Method:

Mix the glutinous rice flour, salt and coconut milk to the hot mashed sweet potato.  Knead until dough does not stick to your hands - slightly on the wet side, it will dry out after resting.  If the dough is soft and pliable, do not add in the water.   Lastly add in oil and knead lightly till dough is shiny. Rest dough for at least 1 hr.

Scale the filling and dough according to the size of the mould.  Flatten it and wrap in a filling.  Seal and shape into a round/  Dust the mould with a little glutinious rice flour.  Press firmly into the mould  Knock and dislodge from mould.  Place on oiled banana leaf.  Continue process with the rest of the dough pieces.

Use tap water and wash off excess glutinious rice flour from the surface.  Do it quickly and lightly before steaming the 'ku' over LOW heat for 5 - 10 minutes. Remove the steamer lid after 5 minutes to lower the heat as the pattern will not be as sharp if the heat is too high.  Remove from steamer and brush with oil for a  shiny surface.


 Serves

Wednesday, June 9, 2010

Taro Ku

When i was growing up, the only 'ku' i know was colored red or orange with a sweet filling.  Nowadays, 'ku' comes in all sorts of colors and shapes with either sweet or savory fillings.  Thank you to enthusiastic cooks who come up with new ideas which kick up a few knotches to the traditional this kuih.  Btw - 'ku' is in hokkien meaning Tortoise and Tortoise symbolizes longevity. When the 'ku'  kuih is shaped like a tortoise shell, it creates a high symbolic and ritual value, very appropriate for ritual offerings during religious events.  These 'ku' , it must be red in color and that is why it is called 'Angku' - 'Ang' means red in hokkien, is an important gift when a child is born (one month old) or during birthdays.  Outside the ritual or gift context, it is also a very popular snack, eaten at all times of the day, be it for breakfast or tea=time.    Have you ever tried pan-frying leftover/overnight 'Angku'? - they are delicious.

Below is a recipe with a new twist - Taro is added to the dough which gives the 'ku' a purplish hue and a fragrance which taro lovers will recognize.  The filling can be sweet or savoury and a spicy one will be met with satisfaction.


Ingredients:
For the Dough:

150 g taro slices - steamed and mashed(keep warm)
150 g glutinious rice flour
50 ml water(use only if the dough is too dry)
50 ml thick coconut milk
1/8 tsp salt
2 tbsp oil
Purple food coloring/taro paste
Extra glutionious rice flour for dusting
Pre-cooked cooking oil for glazing
Banana leaves - cut into rounds and brushed with oil

Filling of your choice or follow this sweet filling recipe

Method:

Sieve glutinious flour with salt.

Add oil and purple food coloring/taro paste to the thick coconut milk and microwave it for 30 seconds.

Add warm mashed taro to the glutinious flour and add in the coconut milk and oil a little at a time, knead until a dough forms.  Water is to be added only if the dough is too dry. Knead dough well until it is shiny. Rest the dough for 30 minutes.

Scale dough according to the size of your mould. 

Flatten dough and roll into a circle.  Put in some filling and wrap dough up.

Dust mould with glutinious flour and knock out all excess flour.

Press filled dough firmly into mould, knock and dislodge from mould.  Place on oiled banana leaf and into steamer rack.

Continue process with the rest of the dough pieces.

Turn on the tap on low and place steamer under the running water to remove excess glutinious flour from the surface of the moulded kuih.

Steam kuih over low heat for 10 minutes.  At 5 minutes, uncover the steamer to lower the temperature of the steam  cos the pattern will be lost if too high heat is used for steaming.  Cover and continue to steam until cooked.

Remove from heat and glaze surface with the precooked oil.


 Serves

Sunday, June 6, 2010

Kuih Pandan Lapis Batavia

I was left home alone one day, the silence was killing me.  There were no one to bug me and knowing me, cannot sit still and do nothing - my sister said that 'it must be the catholic schooling' in us - we feel guilty if we are not doing something.'  So, what a good time it was to stand in front of the oven and layer away.  This is a scale down from Kuih Lapis Batavia, not by choice but necessity, cos i had only a dozen eggs.  I have increased the sugar and egg white slightly thus making the batter lighter and the layers browned  faster with the addition of a little baking powder and the batter was sweeter.

Ingredients:

250g butter at room temperature
60g fine granulated sugar

12 egg yolks
60g fine granulated sugar
1 tbsp  brandy
2 tbsp condensed milk

80g cake flour
1 tsp mixed spice
1/4 tsp baking powder

4 egg whites
30g sugar
1/2 tsp cream of tartar

1/2 tsp pandan paste


Method:

1. Preheat oven to 350f . Line a 6 inch square baking pan with greaseproof paper, making sure that it fits exactly the base.Grease only the base of pan and greaseproof paper only.  Do not grease the sides of pan..
2. Cream butter with 60g sugar till creamy.

3. Beat egg yolk with 60g sugar till thick. Stir in  brandy and condensed milk.

4. Sieve flour, baking powder and mixed spice.

5. Mix butter and egg yolk mixture well. Fold in flour mixture by thirds and mix well.

6. Whisk egg white with medium speed till foamy, add in cream of tartar and continue to whisk till white in colour then add in sugar and whisk until thick, soft stiff peak.

7. Fold egg white into egg yolk mixture and mix well. Add pandan paste to 1/3 of the batter and leave the other 2/3 plain.
8. Spread 3 heap tbsp of batter evenly and bake for 10 minutes.  Turn on the top fire only and brown the top of the first layer.  For the second layer, spoon 2 heap tbsp batter into baking pan. Spread the batter evenly, put to grill . Grill  till brown.(time for browning depends on your oven and how close the baking pan is placed near the grilling elements)   Remove from oven, use a cake tester or toothpick to prick holes on the top of cake.   For the third layer, use the pandan paste batter. Repeat the layering, 2 layers plain and 1 layer pandan, till batter finish. (Use the same type of spoons for the plain and pandan batter so that the layers will be even)

9. Unmould cake immediately and turn on to wire rack to cool.

Thursday, May 27, 2010

Chinese : Chocolate Mooncakes


When my friend Lena told me that her family loved these chocolate mooncake, i had to get the recipe from her and with some tweaking, got to make some of these cuties. I used the moulds that are meant for hard boiled eggs and they turned out so well.

Ingredients:
100 ml water
70 gm brown sugar
10 gm cocoa powder
40 gm unsweetened dark chocolate
20 gm shortening
1/2 tsp chocolate emulco
60 gm koh fun
2 tbsp wheat starch(tung mein fun) add 2 tbsp of hot boiling water
2 tbsp of steamed cake flour
Filling:
300 gm lotus /red bean/mung bean paste
60 gm melted unsweetened dark chocolate
1/2 tsp chocolate emulco


Method:

Put 100 ml water and 70 gm brown sugar in a bowl and microwave for 1 minute. Stir to dissolve sugar.

Pour a little at a time to the cocoa powder and mix well.

Put chocolate and shortening in a bowl. microwave for 1 minute, stir and if chocolate is not totalling melted, microwave another 30 seconds.

Using a bigger mixing bowl, mix the wheat starch with the hot boiling water and stir well. Add iun the koh fun and steamed flour. Mix to combine.

Add in the sugar/cocoa powder mixture and mix.

Add in the melted chocolate and chocolate emulco. Knead well until dough does not stick to the fingers.

Leave covered while you mix the filling.

Filling:

Mix all the ingredients for the filling until well combine.

To make the mooncakes.

To fit the hard boiled moulds - weigh 20 gm filling and 15 gm chocolate skin.

Serves

Thursday, April 1, 2010

Banana And Pineapple Easter Cakes

Easter festival arrives during the spring season and is one of the most important religious holidays celebrated among Christians.  Besides going to church on the first Sunday after the full moon night in the spring season, easter bunnies and eggs occupy supreme positions.  Easter rabbits signify fertility and beautifully painted Easter eggs remind us of spring season. Other symbols are the  Easter lilies and Hot Cross Buns.

HAPPY EASTER


Ingredients:
A:
2 cups all-purpose flour (remove 2 tbsp)
2 tbsp cornstarch
1 tsp baking powder
1/4 tsp baking soda
1/2 tsp cinnamon powder
1/4 tsp salt
1/2 cup brown sugar
1/4 cup fine granulated sugar

B:
2 large eggs
1/2 cup vegetable oil
1 tsp vanilla extract
1 large ripe banana- mashed
1/2 cup chopped pineapple

Method:

Preheat oven to 350f.

Grease moulds which signify spring.

Sieve ingredients A into a large bowl.

In another bowl, beaten eggs lightly, then add in all the other ingredients in B, and mix well.

Pour ingredient B mixture to ingredient A and mix in until is combined in about 10 strokes, do not overmix, it is alright if there are still some flour not mixed.  Leave mixture to rest for about 5 - 10 minutes.

Spoon batter into greased moulds and bake for 18 - 20 minutes.

Cool before frosting with buttercream


Serves

Tuesday, March 30, 2010

Tee nyah kuih

 This 'kuih' is typically 'hokkien' and it is time that i talk about my heritage as hokkien 'lang' after being branded as a 'macau sai' by my paternal grandmother cos me and my siblings do not speak our 'mother tongue' that well or rather not at all. We spoke our Mother's tongue, cantonese, but it should not be our Mother's tongue but my Grandma's - Ah Po, who is cantonese. There was once when i was asked by my Ah Ma to tell this hokkien guy who came to look for my Ah Kong - 'ie kee liao pee la lui lee eh au pit'  - hokkien guy seemed to understand what i said, while i myself took a long time to figure out what i said.  Can any of my 'hokkian lang' readers tell me what i said?. 

This kuih is a speciality and will appear on the table of hokkien families during hokkien festivals.  My one and only Ah Koh, made the best tee nyah kuih and i would like my Ah Ma and Ah Koh to be proud of me by making this kuih although mine is not as good.


Ingredients:

1 lb rice flour
2 tbsps tapioca flour
1/2 tsp borax/ pang sar (optional)
2 tbsps potassium carbonate & sodium bi-carbonate solution
2000 ml/2 liters water
1 ½ tbsps cooking oil
1 tsp salt


Method:

Combine rice flour, tapioca flour, borax, potassium carbonate & sodium bi-carbonate solution, salt together in a microwave-safe bowl. . Add in the water, a little at a time, to prevent lumps. Give it a good mix before adding cooking oil and stir well and make sure borax is  dissolved.

Cook in the microwave until a very thick consistency, stirring after every intervals.
Pour in a greased 9 inches round steaming tray and spoon the 2 tablespoons of tap water over surface of kuih.

Steam kuih over rapidly boiling water for one hour.  Replenish water if necessary.  To prevent condensation, wrap steamer cover with a large piece of cloth(using a bamboo steamer is the best).

Test for doneness with a wooden skewer(lidi) pierced in the centre,  It should come out clean.

Cool kuih for a couple of hours before slicing.

Serve with Hong Bak or Red Cooked Pork or Tau Yue Bak


Serves

Friday, March 26, 2010

Nasi Biryani

I have cooked nasi biryani many times and somehow, this chinese lady is not getting it right.  My nasi biryani did not have the indian or malay umph and more often than not, the rice was not totally cooked through according the method provided in most recipes, and i have to resolve by using the microwave to finish the cooking.  But, nowadays, cooking nasi biryani is no more a problem, thanks to Vivien Tan, one of my readers who have become a dear friend, send me a few packets of 'SHAN"  brand for  biryani .  I followed the instructions on the back of the packet and my biryani rice have always been cooked through and the nasi was spicy, with all the umphs.  I find the taste to be slightly too salty so i reduced the amount of salt recommended to 1 tablespoon, when i was cooking the rice.  Thank you Vivien for sending me the Shan premixed, they are available now here in our indian stores.


Ingredients:

1 1/2 lbs chicken pieces
1 1/3 lb basmati rice - soaked for 30 minutes and drained
1 tbsp tamarind pulp - soaked in 1 cup water for 30 minutes, Then press and sieve the juice.
2 - 3 medium onion - sliced(about 1/2 lb)
2 tbsp grated ginger
2 tbsp chopped garlic
1 cup cooking oil
1 packet 'Shan' Malay Chicken Biryani
Rasins
Fried shallots
Toasted cashew nuts
Cilantro for garnishing

Method:


Marinate chicken pieces with ginger, garlic and 2 tbsp of Shan Malay Chicken Biryani mix for 1 hour.

Heat oil and brown the marinated chicken pieces. Remove and set aside.

Sweat the chopped onions, then add in browned chicken pieces,  the rest of the Shan Malay Chicken Biryani mix, tamarind juice and 1 cup water.  Continue to cook and stir until sauce is thickened. Set aside.

Boil 10 cups of water with 1 tbsp salt and add in the soaked rice.  Boil until the rice is three-quarter tender.  Drain the liquid.

Assembling the Biryani:

Spread the cooked chicken pieces and the drained rice in layers into the rice cooker.

Top with raisins, then cover and press the cook function and cook until rice is cooked through.

Slightly mix the rice and chicken pieces and garnish with cashew nuts and fried shallots before serving.


Serves

Wednesday, March 24, 2010

Easy Cupcake

It's Mother Nature's form of March Madness in Colorado! Heavy snow fell overnight, leaving more than a foot of heavy snow.  I am glad it was not yesterday, cos i had to make and bring these cupcakes to Renee's school, so that her classmates can have them during recess.   A double-dose of lemon extract and lemon juice-- in the cake and in the buttercream frosting -- gives these cupcakes great lemony taste and just the right amount of sweetness -- and they were more than irresistible. 


Ingredients:

2 cups self rising flour or 2 cups bleached all-purpose with 2 tsp baking powder
1 1/4 cup fine granulated sugar
1 teaspoon salt
1/2 cup butter/shortening(very soft but not melted, Crisco is best)
3/4 cup water with 1 tbsp lemon juice(any juice of your choice)
2 large eggs
1/2 tsp lemon extract(pair with the juice of your choice)

Method:

1 Set oven to 350 degrees F.

2 In a large bowl, mix together the flour with sugar and salt until combined.

3 Add in the butter/shortening , beat on medium speed of an electric mixer until all the flour/sugar are coated.

4.Add in eggs and lemon extract to the juice and beat lightly.

5.Add liquid to the dry ingredients and beat until well combined and blended, scraping the bowl constantly. (the batter will be thick, if desired you may add in a few more tablespoons juice).

6. Pour into paper-lined regular size muffin tins filling under just three-quarters full or half full.

7.Bake for 20-22 minutes or until the cupcakes test done (do not overbake as they will be dry).

8.Immediately remove from pans.

9.Cool completely before frosting.

Buttercream:

1/2 cup (1 stick) butter or margarine softened
1/2 tsp lemon extract
2 cups sifted confectioners' sugar (approximately 1/2 lb.)
1  tablespoons milk

Makes: About 1 1/2 cups of icing.


Method:

In large bowl, cream butter/shortening with electric mixer.

Add lemon extract..

Gradually add sifted sugar, one cup at a time, beating well on medium speed. Scrape sides and bottom of bowl often.

When all sugar has been mixed in, icing will appear dry. Add milk and beat at medium speed until light and fluffy.

Keep bowl covered with a damp cloth until ready to use.

For best results, keep icing bowl in refrigerator when not in use.

Refrigerated in an airtight container, this icing can be stored 2 weeks. Rewhip before using.

For thin (spreading) consistency icing, add 1 tablespoons light corn syrup, water or milk.


Serves

Friday, March 12, 2010

Yee Chai Paeng/Ear Biscuit


This is not the cow's or pig's ear, this is like the human's ear, or it is supposed to look like but somehow, these biscuits have their own idea of ears.  Not one will be similar when fried, some looked like tiny cups which we used to called them 'bras' when i was a little kid.  I have to get alexander to help in describing this biscuit, he looked at them and said that they looked like hats - cowboy hats. I told him to tell me more and he was not very co-operative, he said "they are hats and thats it!".  This biscuit must have been served way back before ovens were introduced to the Asians as they are deep fried - who can resist deep-fried ????? - they are so addictive!!!


Ingredients:

1/1/4 cups all-purpose flour
2 tbsp cooking oil
1/2 tsp 5-spice powder
1/2 tsp white pepper powder
1/2 tsp salt
1/8 tsp baking soda
2 tbsp fine granulated sugar
3 tbsp or more water
1 - 2 pieces shallots.

Oil for deep frying

Method:

Pound/grate peeled shallots and mix with 3 tbsp of water.  Pass through a sieve and squeeze as much juice from the shallots.  Discard the pulp.

Mix all other ingredients together and add in the water with the shallot's juice.  Keep adding water, 1 tbsp at a time until a soft and pliable dough is formed.  Knead dough until it is smooth.

Cut dough into 2 portions and roll one portion out into 4 inch x 7 inch rectangle.  Even and straighten edges the best you can.

Roll the dough up tightly, like you would a carpet, making a 4 inch log.  Wrap log loosely with plastic wrap and place it inside the cardboard roll(roll is from the center of toilet rolls).  Using a chinese rolling pin, pound biscuit to fit the cardboard roll and leave in the freezer for 30 minutes.

Repeat with the other portion of the dough.

After 30 minutes, remove dough and slice dough into even  thickness slices - i cut them very thin.

Heat oil for deep frying and when oil is 350f, lower the biscuits and deep fry until golden brown.

Remove and drain well.

Cool before serving or pack into airtight containers.
Serves