Showing posts with label vegetarian. Show all posts

Friday, September 10, 2010

Making Yogurt in the Microwave

This summer, prices for a gallon of milk has gone down tremendously - only $1.49 for a gallon. Thus making homemade yogurt less expensive.although it is already so much less than the store-bought ones. Making your own helps you control the amount of fat you consume but i find that whole milk yogurt is richer and tastes the best. Fruits and berries are of abundance and cheap too, so do add as much or varieties into your yogurt, it is a real treat. Yogurt-making in any other way is a lengthy project, but using the microwave to make yogurt can save you some time in the process


Ingredients:

Glass bowl

4 cups fresh milk
1/4 cup powdered milk (adding this gives a better texture)
2 tbsp. plain yogurt with active cultures - from the supermaket is fine or leftover from a previous homemade batch

Food thermometer

Microwave

Plastic wrap

Dish towel


Method:
Take the plain yogurt out of the fridge and leave it out on the counter - it has to be at room temp. (Yogurt will take a longer time to set if cold yogurt is used)

Pour 4 cups of fresh milk into a glass bowl that is safe to use in a microwave. Choose skim milk for a nonfat yogurt or whole milk for a richer yogurt. (i put the milk in the container that the completed yogurt will be stored in the fridge - save me washing the glass bowl)

Add 1/4 cup powdered milk and stir well.

Put the bowl of milk in the microwave and heat it on high power for 3 - 4 minutes. The temperature of the milk should reach 175 - 180 degrees F. (Time to reach 175 - 180 f depends on the wattage of your microwave) After 4 minutes or more, check the temperature with a food thermometer.(Cooking the milk is to kill unnecessary bacteria present)

Allow the milk to cool down for a few minutes. Keep the thermometer in the bowl and let it cool down until the temperature reads 100 degrees F(Higher temp will kill the culture)

Add 2 tbsp.plain yogurt with active cultures to the milk. This serves as your starter. Stir well.

Cover the bowl with milk and yogurt with plastic wrap (my container has a lid, so i just close it with the lid)and wrap a dish towel around it to provide additional insulation.(It is hot now, summer, so i do not need to wrap with a dish towel, i left it on the counter).

The yogurt will be set eventually and when set, put in the refrigerator to chill, it will set further.(If you like your yogurt sour, keep it longer on the counter before chilling in the fridge)

Enjoy with fruits, granola etc, anything your heart desires.

As part of the Foodbuzz Tastemaker Program, I received this ALL-BRAN Bran Buds from Kellogg's and i have been enjoying it with my yogurt every morning. Thank you Kellogg's.

.


Serves

Saturday, August 21, 2010

Polenta Mushroom Casserole

(4-5 servings)


This layered casserole came about after I purchased a chub of organic polenta.  I had mushrooms, tomatoes and cheese at home and was planning on making lasagna with them, but this turned out to be a delicious alternative.

2 tsp olive oil
2 cloves garlic, minced
1 onion, chopped
1 1/2 lbs mushrooms, sliced
1- 1 1/2 tsp fresh rosemary, leaves minced
2 tsp Better Than Bouillon Organic Mushroom Base
1/4 cup white wine (optional)
1 cup ricotta cheese
1/3 cup soft goat cheese
3 tbsp unbleached flour
salt and freshly ground black pepper
18 oz chub of polenta (I might make this from scratch another time)
2 large tomatoes, sliced
1/3 cup of shredded cheese (I used gruyere and garlic cheddar)

Butter an 8 inch square baking dish and set aside.

Heat the oil in a large skillet. Add the garlic and saute for a minute, then add the onions and continue to cook until they soften and take on an amber hue.

Add the mushrooms, rosemary, mushroom base and wine if using. Stir well to combine and then cook until most of the liquid has evaporated; about 15 minutes.

Stir in the ricotta and goat cheeses; season with salt and pepper. Sift the flour evenly over the mixture and stir to combine well. Set aside

Preheat the oven to 350ºF.

Remove the plastic from the polenta and cut into slices; the thickness being determined by the ability to line the baking dish with two layers.

Place a layer of polenta (half of the chub) over the bottom of your dish. Cover with half of the mushroom mixture, then half of the tomatoe slices, and half of the shredded cheese.

The repeat these layers with the remaining polenta slices, mushroom mixture, tomatoes and cheese.

Bake for about 50-60 minutes or until it's hot and bubbling. Allow to cool for about 15 minutes, then serve. This is also good at room temperature.

Friday, July 16, 2010

Gombapörkölt; Hungarian Mushroom Stew

(about 4-6 servings)


My Hungarian grandmother used to make this stew. I wish I had paid more attention back then. She died about 15 years ago, and the last time I saw her was easily 3-4 years before that.

photo: www.traveladventures.org
She lived in Vienna in a small apartment, walking distance from Schönbrunn Palace. We often went there on the weekends for long walks on the beautiful grounds, (I started school in Vienna and lived with my grandparents during that time).

My version doesn't seem quite as good as the one my grandmother made. I'm never sure, if it's not enough salt or the brand of paprika, but I make it regardless, and think of her while I eat it. She had the softest skin, and always smelled of Lily of the Valley.

1 tbsp canola oil (my grandmother used lard)
1 clove garlic, minced
1 large sweet onion, diced
2 lbs mushrooms, sliced
1 red or green bell pepper, diced
2 tbsp flour
1 1/2 - 2 tbsp Hungarian sweet paprika
1 1/2 tsp Hungarian hot paprika
1/2 cup cold water
2 tbsp tomato paste
2 tsp Better Than Bouillon Organic Mushroom Base
3/4 cup plain yogurt
1/4 cup sour cream
splash of wine, (optional; I just happened to have some)
small handful fresh parsley, chopped
salt and freshly ground black pepper to taste

Heat the oil in a large saucepan. Add the garlic and cook for about a minute, then add the onion. Continue cooking until the onion  takes on an amber hue.

Add the mushrooms and red pepper. Stir and cook until the mushrooms begin to soften.

Combine the flour and paprika in a small bowl. Slowly whisk in the cold water, tomato paste and mushroom base, and whisk until smooth.

Pour this over the mushroom mixture. Lower the heat and cover the saucepan. Allow to simmer gently for about 20-25 minutes. Stir occasionally.

Stir in the yogurt, sour cream, wine and parsley until well combined; heat through. Adjust the seasoning with salt and pepper.

Can be served over cooked rice or egg noodles. I usually just have it on it's own, like soup or stew.

Garnish with additional sour cream and parsley if desired.

Saturday, July 10, 2010

Guacamole

(about 1 1/2 cups)


We haven't really had the brutal sort of heat I've become accustomed to this time of year. It's rained quite a bit which is really nice, but that messes with the humidity and raises those levels. Regardless, it's never entirely comfortable outside for me, so I'm tucked away inside where it's air conditioned.

The heat and humidity usually slow me down to the point where I'm not really in the mood to cook much. Today is no exception. I tossed together this guacamole instead, which came together very quickly.

2 avocados, peeled, seeded and cubed
1/4 - 1/2 clove garlic, minced (optional)
juice from 1 - 2 small key limes
a few drops of hot sauce
1/2 jalapeno pepper, seeded and chopped
1 small plum tomato, chopped
1/2 green onion, chopped
2 tbsp fresh cilantro, chopped
salt and freshly ground black pepper to taste

corn chips

Place the avocado, garlic, lime juice, hot sauce and jalapeno pepper into a bowl. Mash together with a fork. Stir in the tomato, green onion, and cilantro. Season with salt and pepper.

Serve with corn chips.

Friday, July 9, 2010

Italian Tomato and Cheese Tart

(one 9" tart)


This is a great summer dish when tomatoes are at their peak.

crust
3/4 cup unbleached flour
1/2 cup wholewheat pastry flour
1/2 tsp salt
6 tbsp butter, cut up and chilled
2-4 tbsp cold water

Place the flours and salt into the bowl of a food processor and pulse a few times to combine.

Remove the top and evenly distribute the butter pieces. Replace the top and pulse as few times until the butter is roughly chopped and mixed with the flour (small pea sized).

Remove the top again and sprinkle 2 tablespoons of water over the flour and butter mixture. Place the top back on and pulse a few more times. The mixture should look like it's about to clump together. If not, then add a bit more water.

Gather up the dough and shape into a flattened ball. Refrigerate for about 15 minutes.

Roll out the dough on a floured surface into a circle to fit a 9" pie or tart pan. Wrap the dough around the rolling pin and unwrap into the pan. Press into the pan and remove excess dough from the edges and set aside.

filling
1 clove garlic, finely minced
1/2 cup ricotta cheese
2 tbsp fresh basil, chopped

1/4 cup roasted or sauteed onions, sliced or chopped
6 oz cheese, shredded (I combined gruyere, garlic cheddar and edam)

2-3 tomatoes, sliced (enough to cover the top)
1 tbsp fresh basil, sliced
2 tbsp parmesan cheese, grated or shredded
freshly ground black pepper
salt, to taste (optional)

Preheat the oven to 375ºF.

Combine the garlic, ricotta, and basil. Spread evenly over the bottom of the tart shell.

Scatter the onion over the ricotta mixture and then cover with an even layer of the shredded cheese.

Arrange the tomato slices over the shredded cheese. Sprinkle the sliced basil and parmesan cheese over the tomatoes. Finish off with some freshly ground black pepper.

Sprinkle a bit of salt, if needed.

Bake for about 50-60 minutes, or until the tart is done.

Wednesday, July 7, 2010

Sun-Dried FetaTomato Spread

(about 1 cup)


The jar of sun-dried tomatoes is almost finished. They were so good! I combined the last of them with feta cheese and yogurt for this delicious spread.

I can hardly walk past the refrigerator without stopping, pulling out this spread and having some of it with a multi-grain cracker or two.

1/2 lb feta cheese
1/4 cup sun-dried tomatoes, packed in oil and drained
1/4 cup greek style plain yogurt, (or sour cream if you prefer it less tart)
1 small clove garlic, chopped
freshly ground black pepper
1/2 green onion, sliced


Place the feta, sun-dried tomatoes, garlic, yogurt and black pepper into the bowl of a food processor and process until smooth.

Add the green onion and pulse until just mixed.

Serve with bread or crackers.

Sunday, June 20, 2010

Mushroom Ravioli

(about 6-8 servings)


Last week I dug out my pasta machine after I came across some beet powder. I'm on a bit of a pasta roll at the moment, and decided to make some ravioli this weekend.

In the past I've usually made fillings with spinach and ricotta cheese, but I'm quite fond of mushrooms and decided to make a mushroom filling after finding some very nice looking baby portabella at the grocery store.

Filling
1/2 oz dried porcini mushrooms
1/2 cup hot water

1-2 tsp olive oil
2 cloves garlic, finely minced
1 large onion, finely chopped
1 1/4 lb mushrooms, cleaned and finely chopped
1/4 cup marsala
1-2 pinches dried thyme
1/2 cup mascarpone cheese
salt and freshly ground black pepper

Soak the porcini mushrooms in the hot water for at least 30 minutes. Remove and chop; reserve the liquid.

Heat the oil in a nonstick skillet. Add the garlic and fry for about a minute, then add the onion and saute until it's transparent and has a light golden hue.

Add both the porcini and chopped fresh mushrooms, the reserved mushroom liquid, marsala and thyme. Cook until the mixture becomes somewhat dry; about 15-20 minutes.

Remove from heat, cool a bit. Stir in the mascarpone cheese. Check seasoning and add salt and pepper as needed.

pasta
1 1/2 - 1 3/4 cup unbleached flour
1 1/2 cup semolina flour
1 tsp salt
4 large eggs
1-3 tbsp water

serve with
lightly browned butter and grated parmesan cheese

Place the 1 1/2 cups flour (to start), semolina and salt into the bowl of a food processor fitted with a steel blade. Pulse a few times to combine.

Add the eggs and 1 tablespoon of water to start. Pulse a few times. If the mixture seems too dry, sprinkle a bit more water over the mixture.

The dough should have the consistency of fresh bread crumbs, and be moist enough to stick together if you gather a small amount and gently squeeze it together. Some people add enough water until the dough forms a ball inside the bowl, but I prefer mine to be somewhat dryer. If I have added too much liquid and get a ball, I add a bit more flour until the ball breaks up again.

by hand
Gather up the dough and knead for a few minutes on a lightly floured surface until you have a smooth ball. Cover and allow to rest for about 20 minutes.

Roll out the dough to about 1/8" thickness in whatever shape you need for how you will make the ravioli. I am using a ravioli form which I will describe below.

with pasta (crank) machine
Gather a small handful of dough and squeeze together. Flatten the piece and run it through the pasta machine at the widest setting a few times. Fold and pass through a few more times, tightening the setting each time. This helps develop the gluten.

Crank out a piece long enough to cover the ravioli form. Place over the form and gently push the pasta sheet down using the plastic domed sheet.

Place a bit of filling into each indentation, wet the edges with a bit of water. Roll out a second sheet of pasta and place over the first pasta sheet and fillings. Roll over with a rolling pin to cut the ravioli; turn over and separate.

Repeat until the dough and filling is used up.

Boil the ravioli in batches in lightly salted boiling water for about 2-3 minutes. Drain and toss with butter and sprinkle with grated cheese.

Saturday, June 19, 2010

Olive Hummus

(about 3 cups)


Hummus has got to be one of the easiest things to make at home, and in my opinion it tastes much better than the ready made stuff. I usually intend to make a simple one with just a bit of garlic and lemon juice, but invariably I end up coming across something in my refrigerator or pantry and add that to the mix.

This time it was olives, and the hummus turned out great.

1 25 oz can chick peas (garbanzo beans), drained
1/2 cup tahini paste
1/2 cup olives, I used a combination of kalamata and spanish
1/4 cup water
3-5 tbsp freshly squeezed lemon juice, to taste
2 tbsp olive oil
1-2 cloves of garlic, roughly chopped
freshly ground black pepper
salt, if needed

Place everything, except the salt, into the bowl of a food processor, and process until smooth. Check for seasoning. Add the salt if needed.

Serve with pita bread or crackers. Drizzle with a bit of olive oil if you wish.

Saturday, June 12, 2010

Beet Tinted Pasta with Fresh Tomato Sauce

(2 servings; double or triple this recipe for more)


I make this when tomatoes are in season. It's one of those weekend type dishes for me where I chop a few things up in the morning and then get back to making the rest of it later in the day.

This dish is fine without cheese and I don't really miss it.  If you'd like to add some cheese though, I do think a bit of crumbled goat cheese might be nice in this.

Don't worry about the beet powder if you can't find any. I happened to notice some in the bulk spice section the other day, and brought some home. I also used yellow and orange tomatoes. What can I say, I love seeing different colours on my plate.

tomato sauce
2 medium tomatoes, chopped (about 1- 1 1/3 cups)
1 tbsp fresh herbs, chopped, (parsley, chives, mint, dill; anything you have on hand and like)
1 tbsp balsamic vinegar
2 tsp olive oil
salt and freshly ground black pepper

Combine all of the ingredients in a large bowl and allow to sit for a few hours.

beet pasta
1 1/4 - 1 1/2 cups unbleached flour, (or use 50/50 unbleached flour and semolina flour)
1 tbsp beet powder, (optional)
1/2 tsp salt, or to taste
1 large egg
1-3 tbsp water

Place 1 1/4 cup flour, beet powder and salt into the bowl of a food processor fitted with a steel blade. Pulse a few times to combine.

Add the egg and 1 tablespoon of water to start. Pulse a few times. If the mixture seems too dry, sprinkle a bit more water over the mixture.

The dough should have the consistency of fresh bread crumbs, and be moist enough to stick together if you gather a small amount and gently squeeze it together. Some people add enough water until the dough forms a ball inside the bowl, but I prefer mine to be somewhat dryer. If I have added too much water and get a ball, I add a bit more flour until the ball breaks up again.

by hand

Gather up the dough and knead for a few minutes on a lightly floured surface until you have a smooth ball. Cover and allow to rest for about 20 minutes.

Roll out and cut as desired


with pasta (crank) machine

Gather a small handful of dough and squeeze together. Flatten the piece and run it through the pasta machine at the widest setting. Fold and pass through a few more times, tightening the setting each time. This helps develop the gluten.

When you have the desired thickness, run it through the cutter.

Repeat, until the dough mixture is used up.

Drop the pasta into lightly salted boiling water, and cook for 2-4 minutes, depending on the thickness of the pasta.

Drain and toss the pasta with the tomato sauce. Serve.

Saturday, May 8, 2010

Mango Pudding

(4 servings)


I'm not entirely sure if this is still considered a Chinese dessert if I swap out the evaporated milk for coconut milk. In any case, the coconut milk compliments the mango very nicely.

1 1/4 cups water
1/3 cup sugar
5-6 gms agar agar, (this is the easiest measurement because of how it's packaged, bars or powder)
2 small mangoes, peeled, chopped, then pureed
1 1/2 cups coconut milk, (12 oz can)

1 small mango, peeled and cubed or sliced


If you are using the bar form of agar agar, then break it into several pieces and place them into a bowl. Cover them with cold water and allow to soak for about 30 minutes. Remove them and squeeze out the excess water. Tear into smaller pieces.

Heat the water and sugar. Add the agar agar and simmer until the agar agar has dissolved; about 5-9 minutes. Remove from heat and stir in the mango puree and the coconut milk.

Pour into  serving bowls and let stand until it sets. Serve with sliced or cubed mango.

Friday, April 9, 2010

Matar Paneer, Peas with Cheese

(serves 4 as a main course)


This is another one of my favourite dishes. There's an Indian restaurant near where I live and their version of this is very good, which prompted me to try out my own. Mine turned out a bit different probably because of the combination of spices I chose, but in the end I liked mine even better. :)

I decided to make the paneer as it's really quite simple to do and ends up costing less than purchasing the ready made stuff (if you can even find it), and I wanted to use hormone and antibiotic free milk.

paneer (makes about 1/2 lb)
1/2 gallon of milk, (I used 1%)
1/2 tsp salt
2-3 tbsp white vinegar
cheesecloth

Bring the milk and salt to a boil in a large saucepan, being careful not to let it burn. Remove from heat.
Add 2 tablespoons of vinegar and stir for about a minute until the milk curdles. If the curds don't separate enough from the whey, then keep adding 1 tsp of vinegar at a time until they do.


Place the cheesecloth in a colander over a large bowl (so you can reserve the whey)* and strain the curds. Pull up the edges of the cheesecloth and gently squeeze to remove any excess whey.


Place the cheesecloth and curds onto a large plate and weigh down the top with something like a heavy frying pan or cutting board. Leave this for about 2 hours, then either use the paneer or wrap it and refrigerate.


*I came across uses for whey at Chowhound . I added some to the Matar Paneer, and I'll use some for the rice which will accompany this.

Matar Paneer (can be made a day ahead and reheated)*
2 tbsp ghee, or clarified butter (or just plain unsalted butter)
1/2 lb paneer, cut into 3/4" cubes
1 large sweet onion, cut into quarters
2 large cloves garlic
2" piece of fresh ginger, skin removed
2-3 jalapeno peppers, seeded
1 tbsp garam masala
1 tsp turmeric
1 tsp cumin
1 tsp ground coriander
1 tsp paprika
1/2 tsp cinnamon
pinch or more of cayenne, to taste
1/2 6oz can tomato paste, (freeze the other half for another use)
3/4 cup plain yogurt
1 cup water or whey
3 1/2 cups shelled peas, (1 lb bag frozen)
1/3 cup heavy cream (optional)
salt to taste
small handful fresh cilantro, chopped

Heat 1 tablespoon of  ghee (half) in a large non-stick skillet and add the paneer cubes. Fry them until they are a light golden brown. Remove and set aside.


Place the onions, garlic, ginger and jalapeno peppers into the bowl of a food processor, and process until smooth.

Add the remaining 1 tablespoon of ghee to the skillet, set the temperature to medium-low and add the pureed onion mixture. Cook, stirring from time to time until it thickens; about 15 minutes.


Stir in the garam masala, turmeric, cumin, coriander, paprika, cinnamon and cayenne. Cook for another minute or two.

Add the tomato paste, yogurt and water or whey. Stir well then cover and simmer gently over low heat for about 25 minutes.

Stir in the peas and the paneer, and simmer for another 8-10 minutes.

Stir in the heavy cream (or more water or whey if the mixtures seems too thick) and the chopped cilantro. Bring back to a simmer. Add salt if needed.

Serve with rice and/or naan.

*This dish seems even better reheated the next day.

Saturday, March 6, 2010

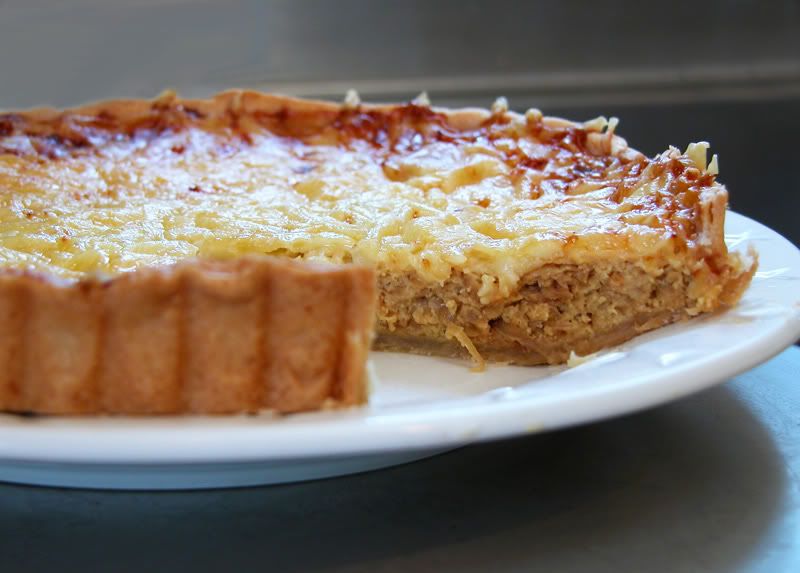
Caramelized Onion Tart


(6 servings)


Whenever I see those large Vidalia onions at the market, I think of this tart. The sweetness of these onions becomes very apparent after a long and slow saute over low heat. It takes a while, but the wait is worth it.

2 tbsp olive oil
3 large Vidalia onions, sliced (about 2 lbs)
3 large eggs
1/2 cup sour cream
1/4 cup milk
salt and freshly ground pepper to taste
pinch of nutmeg

1 9" unbaked pie shell

2 cups shredded swiss cheese

Heat the oil in a large non-stick skillet over medium-low heat and add the onions. Toss them to distribute the oil. Adjust the heat to low and saute these gently until the onions have taken on an amber hue; about 45-60 minutes. Check them every 10 minutes or so and stir them up a bit. Remove from heat.
 
Preheat oven to 450°F.

In a small bowl combine the eggs, sour cream and milk. Whisk until smooth. Add the salt, pepper, nutmeg and the onions and toss to combine evenly.

Spoon the mixture onto the pie shell and sprinkle the cheese evenly over the top.

Bake in the centre of the oven for 10 minutes, then lower the heat to 350°F and bake another 10-15 minutes or  until the pie is puffy and the top is browned.

Cool for 5 minutes before slicing. This tart goes well with a simple green salad.

Friday, February 19, 2010

Taro Crunch

When i was shredding taro for Yee Sang, i remembered this snack.  I shredded more taro and made this forgotten snack which was so crunchy.  The taro is sometimes called the "potato" of the humid tropics and indeed it is - a good taro will be fluffy in texture just like the potato.  Taro is quite costly and choosing a good one which will be fluffy is crucial to your pocket and the dish you will be preparing. For a good fluffy taro, choose one that is shaped like a vase - narrow on the top and bottom, wide in the middle and it has to be as smooth as possible - no bumps or knotches.  Bumps mean that the taro has been constricted from growing well and that it has been grown in muddy soil.  Taro grown in sandy soil, grows well and will be fluffy. I have given up buying taro with skin on and have been buying peeled ones, although peeled ones are very much more expensive, at least i can see that the taro will be fluffy and not rotten. 

Taro is so versatile and there are endless recipes which are classics, below are some of the tested recipes -

Woo Tau Koh
Taro fatt koh
Woo Tau Kow Yoke

Woo kok
Taro Shredds

Taro and black-eyed pea cake
Taro fragrant rice
Sueen poon cheeBubur Cha Cha

Fried Nin Ko

There are many more recipes that i would like to try - like Or Nee, Taro Cake, Taro Filling for mooncake and many more.


Ingredients:

1 lb shredded taro
1 cup roasted peanuts - chopped
½ cup sesame seeds
3 - 5 tbsp rice flour
1/2 tsp 5 spice powder
1 tsp salt.
Water to bind


Method:

Mix all the ingredients, followed by a little water to bind ingredients.

Heat oil for deep frying and when oil is 350f, using the chopstick, pick up a little taro shreds and deep fry till golden brown and crispy.

Drain well and let cool before storing.


Serves

Monday, February 15, 2010

Seaweed and Rice - Renee and Alexander's Lunch


After all the feasting during the Chinese New Year Celebration, Renee and Alexander were very happy just to have plain rice with seaweed.


Ingredients:

Plain Rice - warm
Seaweed
Cute Moulds

Method:

Pack warm rice into moulds and then decorate with seaweed.

Serves

Wednesday, February 10, 2010

Yee Sang Prep - Day 2 - Taro Shreds

Yee Sang is actually a salad and i am surprised that so many people including asians, do not know or have eaten this dish.  Read about it from here.  This salad consists of all the tastes and texture to teast your palate and color to please your eyes.  Crunchiness is one of them and taro shreds fried until crispy in 2 colors is one of the ingredients.


Ingredients:

Fresh taro
Red food coloring
Green food coloring
Oil for deep frying
Method:

Shred fresh taro with a mandoline and if the taro has been frozen, it would have to sliced thin and then julienned cos the taro will be too soft to pass through the mandoline.


Color a portion of the taro shreds with green food coloring


Color another portion with red food coloring


Heat enough oil for deep frying and when oil is hot - 350f - deep fry the shreds until crispy.  Remove from oil and let it drain.


Repeat the deep frying for the green colored taro shreds.


When cooled, store in airtight container.


Serves

Sunday, February 7, 2010

Creamy Butternut Squash and Goat Cheese Risotto

(4 servings)


Risotto is typically made with a starchy short grain rice such as arborio. Hot broth is added in small amounts and cooked until it's absorbed into the rice, creating a creamy consistency. Usually, you can count on using about 4 cups of broth for every cup of rice.

This isn't a dish you can cover and leave as it requires constant stirring as the liquid is absorbed. It takes about 30-40 minutes to make and the time spent is well worth the result, I think.

4 cups vegetable broth
1 butternut squash (about 1 lb)
2 tsp butter
1 sweet onion, diced
1 clove garlic, minced
1 1/4 cup arborio rice
salt to taste
1/4 tsp freshly ground black pepper
1/2 tsp rubbed sage
1/2 cup dry white wine
about 5 oz soft goat's cheese, (it was a small package, so give or take a bit)

Preheat oven to 375°F.

Cut the squash into quarters and scoop out the seeds. Place on a cookie sheet and bake for about 30 minutes. When they are cool enough to handle, remove the skin and cut into small  1/2 "cubes, (don't worry if the squash seems undercooked in parts). Alternately, you could skip this step and just remove the skin and seeds and shred them. I don't like fighting it out with the tough skin, so I just throw them into the oven to make the removal easier.

Heat the broth and add the squash. Cook for about 5 minutes, then lower the heat to keep hot.

Melt the butter over med-low heat in a non-stick skillet, and add the onion and garlic. Saute until the onion is light brown in colour, about 10 minutes.

Raise the heat to medium and add the rice, salt, pepper and sage. Stir well until the rice is evenly coated with the onion mixture.

Add the wine and stir frequently until most of the liquid is absorbed. Reduce to heat to about medium low and add the broth mixture by the ladle, and continue to cook and stir until the liquid is absorbed after each addition.

When the risotto is practically done, add the goat cheese and stir well. Let the risotto stand for 2-5 minutes, then serve.

Saturday, January 30, 2010

Feta Cheese Spread

(4-6 servings)


Whenever I don't feel like cooking, I resort to cheese and crackers. This spread is much nicer than plain slices of cheese, and it's quick and easy to make.

1/2 lb feta cheese
1 small clove garlic
1 tsp Hungarian sweet paprika
1 tsp Hungarian hot paprika
1 tsp dried mint
2 tbsp olive oil

Place all the ingredients into the bowl of a food proceesor and process until smooth.

Drizzle with a bit of olive oil and serve with bread or crackers.

Tuesday, September 22, 2009

Cassava Fritters/Ketuk Ubi


I love everything cassava/tapioca/yucca/ubi kayu and have not had these fritters for quite awhile. I have refrained from buying the fresh cassava as they have become moldy and shrivered and that is the sign of a dead root. In Malaysia, the root has to be consumed as soon as it has been harvested so, it is a strange sight for me, seeing them for sale in the asian store's shelf. I am enlightened by the fact that these roots are treated with wax to prevent them from getting moldy and save to eat. Thanks Chan, for letting me know and allowing me to enjoy and making all the goodies that can be dished out from them.


Ingredients:
2 cups cooked cassava
1 cup grated coconut - white only
1/2 cup sugar
a pinch of salt
Oil for frying
Batter:
1/2 cup all-purpose flour
1/4 cup cornflour/cornstarch
1 tbsp rice flour
1 tsp double action baking powder
1/2 tsp salt
1 1/2 cooking oil
3/4 cup/6 fl oz/180 ml water

Method:

Prepare the batter by mixing all the batter ingredients and leave aside.
Heat oil until 350f. While oil is getting hot, prepare the cassava balls by mixing all the ingredients together and making into golf size balls.
When oil has reached 350f, dip balls into batter and put into hot oil to deep fry. Do not crowd the wok and crank up the heat and removing some hot oil from the wok, at the last stage of frying. Removing some oil will allow the temp. of oil to rise higher and faster and this way, the balls will be not be soggy. When balls are golden brown, remove and drain on an overturn cake rack which is sitting on kitchen towels - the excess oil will drip down and since the balls are not touching the kitchen towels, they will not soak back the oil while cooling.
Pour back the removed oil and finished frying the rest of the balls.
Note:
Noticed the long one? I have left some cooked cassava unmashed and dipped them in batter to fry. Try it this way, it is just as delicious.


Serves